Removing the M.2 whitelist on a ThinkPad T440p
I recently picked up a Lenovo ThinkPad T440p, a pretty good machine - sturdy, decent battery life, and upgradeable to be a pretty powerful machine.
There’s just one problem. Disobedience:
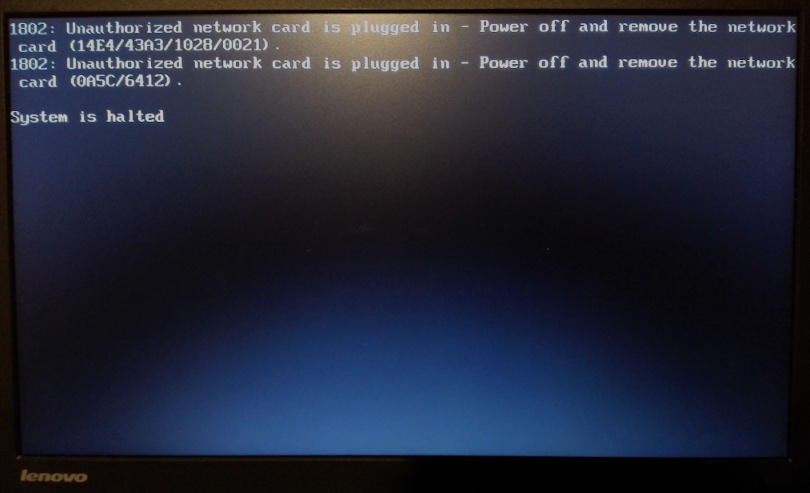
Yes, this is one of those machines, those that try to tell you what you are allowed to install in it and what not.
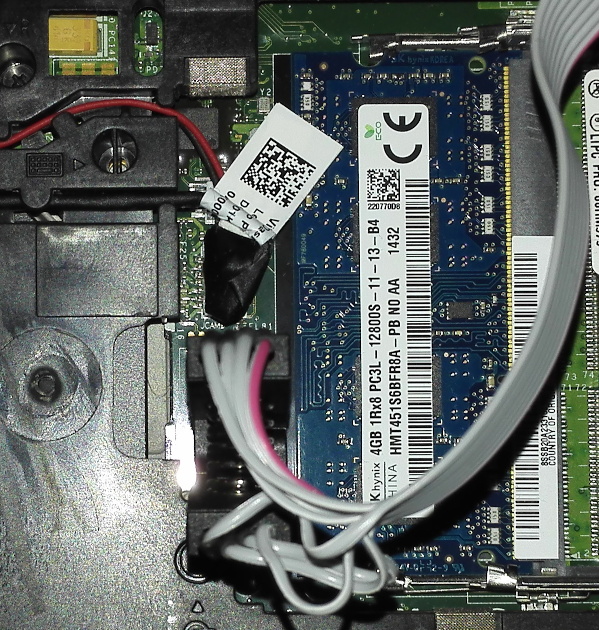
The problem
When your T440p turns on, there’s a special kind of software that gets run. This software used to be called “BIOS”, but nowadays, “UEFI firmware” more accurately describes it. This firmware is stored on an SPI flash chip located near the RAM-slots, and it’s responsibility is not only to initialize the hardware, but also to provide configuration options to the user and an interface to the operating system. Unfortunately for us, Lenovo chose to include a special module called “LenovoWmaPolicyDxe” in their firmware, whose sole responsibility is to check hardware found in the M.2 slot against a list of allowed hardware (called a whitelist), and, if it’s not on the list, prevent the system from booting.
Now, Lenovo is not the only company to do that, but it’s one of the more prominent examples. They’ve been pissing off their customers with this bullshit for years.
The solution to this is obvious: We need to modify the firmware (or the “LenovoWmaPolicyDxe” module, to be specific) to stop refusing hardware that’s not on the whitelist. Now, there are places on the internet where you just upload your firmware image, and someone will send you an appropriately modified image back. I’m not a huge friend of magic binaries sent to me by strangers, especially if they’re that critical, plus I’d like to know what’s going on inside of it, so that’s no option for me. Instead, I’m going to get out the tools and modify the firmware myself.
Note: If you’re not interested in the how & why and only want to see the end result, skip to the “TL;DR:” section at the end of this post.
Tools used
Of course there are several tools required for this adventure:
- UEFITool, which is a tool to view, extract and modify UEFI firmware images. Also includes UEFIPatch, which we’ll use later to do the actual modifications to our image.
- Ghidra, a reverse engineering tool developed by the NSA. There are other options here, such as Radare2 or IDA (well, if you can pay for it, that is), but I went for Ghidra because it has a very good decompiler built in and an ok UI (as well as it being open-source and free of cost). Keep in mind though that Ghidra is still pretty new, so don’t be surprised if you hit a bug (I’ve hit several).
- little-behemoth.h, a C header file including all important UEFI data types.
Dumping the firmware
I’m keeping this short, since it’s not the scope of this article.
To dump the firmware of your T440p, you need an SPI flasher and a SOIC8-clip, plus the software to actually to use the flasher. I used a CH341A, since it can be bought together with the SOIC8 clip for very little money, and since I’m on Linux, flashrom is the software I use. Just attach the flasher and clip appropriately and run this command to dump the firmware: sudo flashrom -p ch341a_spi -r uefi.bin.
Keep in mind that the image you dumped may be corrupt if your clip doesn’t have a proper connection - always create multiple dumps (I did five) and compare them (with sha256sum for example), also try to check whether they look incomplete in UEFITool.
Extracting the module
The firmware version used in this article is 2.53. If you use a different UEFI firmware version, there will be differences!
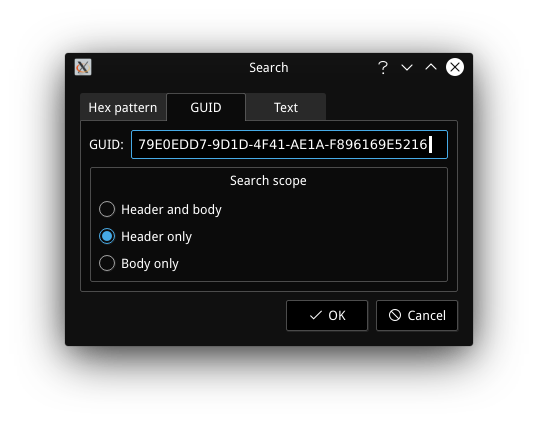
To extract the LenovoWmaPolicyDxe module, we’re going to use UEFITool. Start it up, and open your firmware image with “File”->”Open image file…”. To find the module we’re looking for, select “File”->”Search…”, then select the “GUID” tab, and enter 79E0EDD7-9D1D-4F41-AE1A-F896169E5216.
After clicking “Ok”, a search result should appear in the “Messages” box. Doubleclick on it to get taken to the module it found, which should be named “LenovoWmaPolicyDxe”. Click on the small arrow next to it to expand the entry, right-click on the “PE32 image section” entry and choose “Extract body…”. Enter the name “LenovoWmaPolicyDxe” and save the file.
You may wonder - how do we know this is the module containing the whitelist check? Well, UEFITool can also extract the whole UEFI image, which is something I did to then search the extracted files for the error string that appears when you install a non-whitelisted WLAN card. I found this error string, encoded as UTF16-LE, in this module, together with a list that contained the vendor and product IDs of the WLAN card previously installed in my T440p. This is how I knew which module to inspect.
Analyzing the module
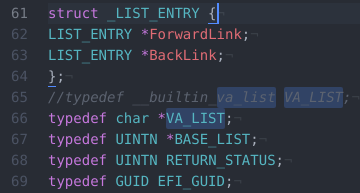
Before we start with Ghidra, open up the little-behemoth.h file with a text editor of your choice. As it is, this file is not compatible with Ghidra, so you’ll need to find the line typedef __builtin_va_list VA_LIST; and change it to typedef char *VA_LIST;.
After that’s done, we can start up Ghidra. Create a new project, and then press “i” to import a file into your project. Select the “LenovoWmaPolicyDxe.bin” we extracted earlier, and double-click on it in the project view.
You should now see a window called “CodeBrowser”, which is where our analysis will take place. If you’re asked to let Ghidra start an automatic analysis, do so. As a first step, click on the small arrow next to “Functions” in the “Symbol Tree” window on the left. This will allow you to see all functions that Ghidra’s analysis identified. What you’ll want to do next, is to select “File”->”Parse C Source…”. Click on the small “+” sign and select the “little-behemoth.h” file.
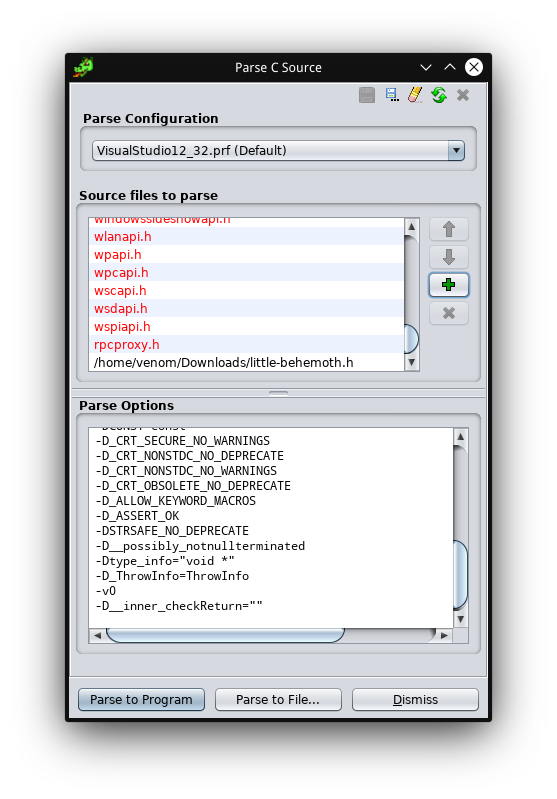
Then click “Parse to Program”.
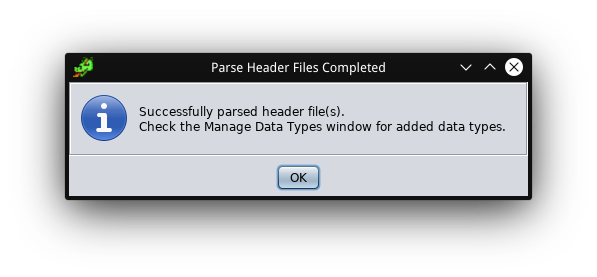
Good, now Ghidra understands UEFI data types, which will allow us to get much better decompiler output.
Inspecting the entry point
If you’ve ever used a programming language similar to C, you’re probably familiar with the “main”-function. You may have also wondered how and why this main function gets called - this is usually the job of another function, often called “_start” or something similar, and it is usually the first function to run when a program starts. When your OS starts a program, it inspects the file headers to find an entry describing the entry point - in other words, the beginning of the “_start” function.
UEFI utilizes many concepts and formats originally coming from Windows, such as the PE file format - yes, UEFI modules follow the same format as your usual Windows .exe file. This is good for us, since it allows Ghidra to understand the format and tell us where the module starts execution. Ghidra find the entry point, and calls the function that starts execution “entry”. Let’s check it out:
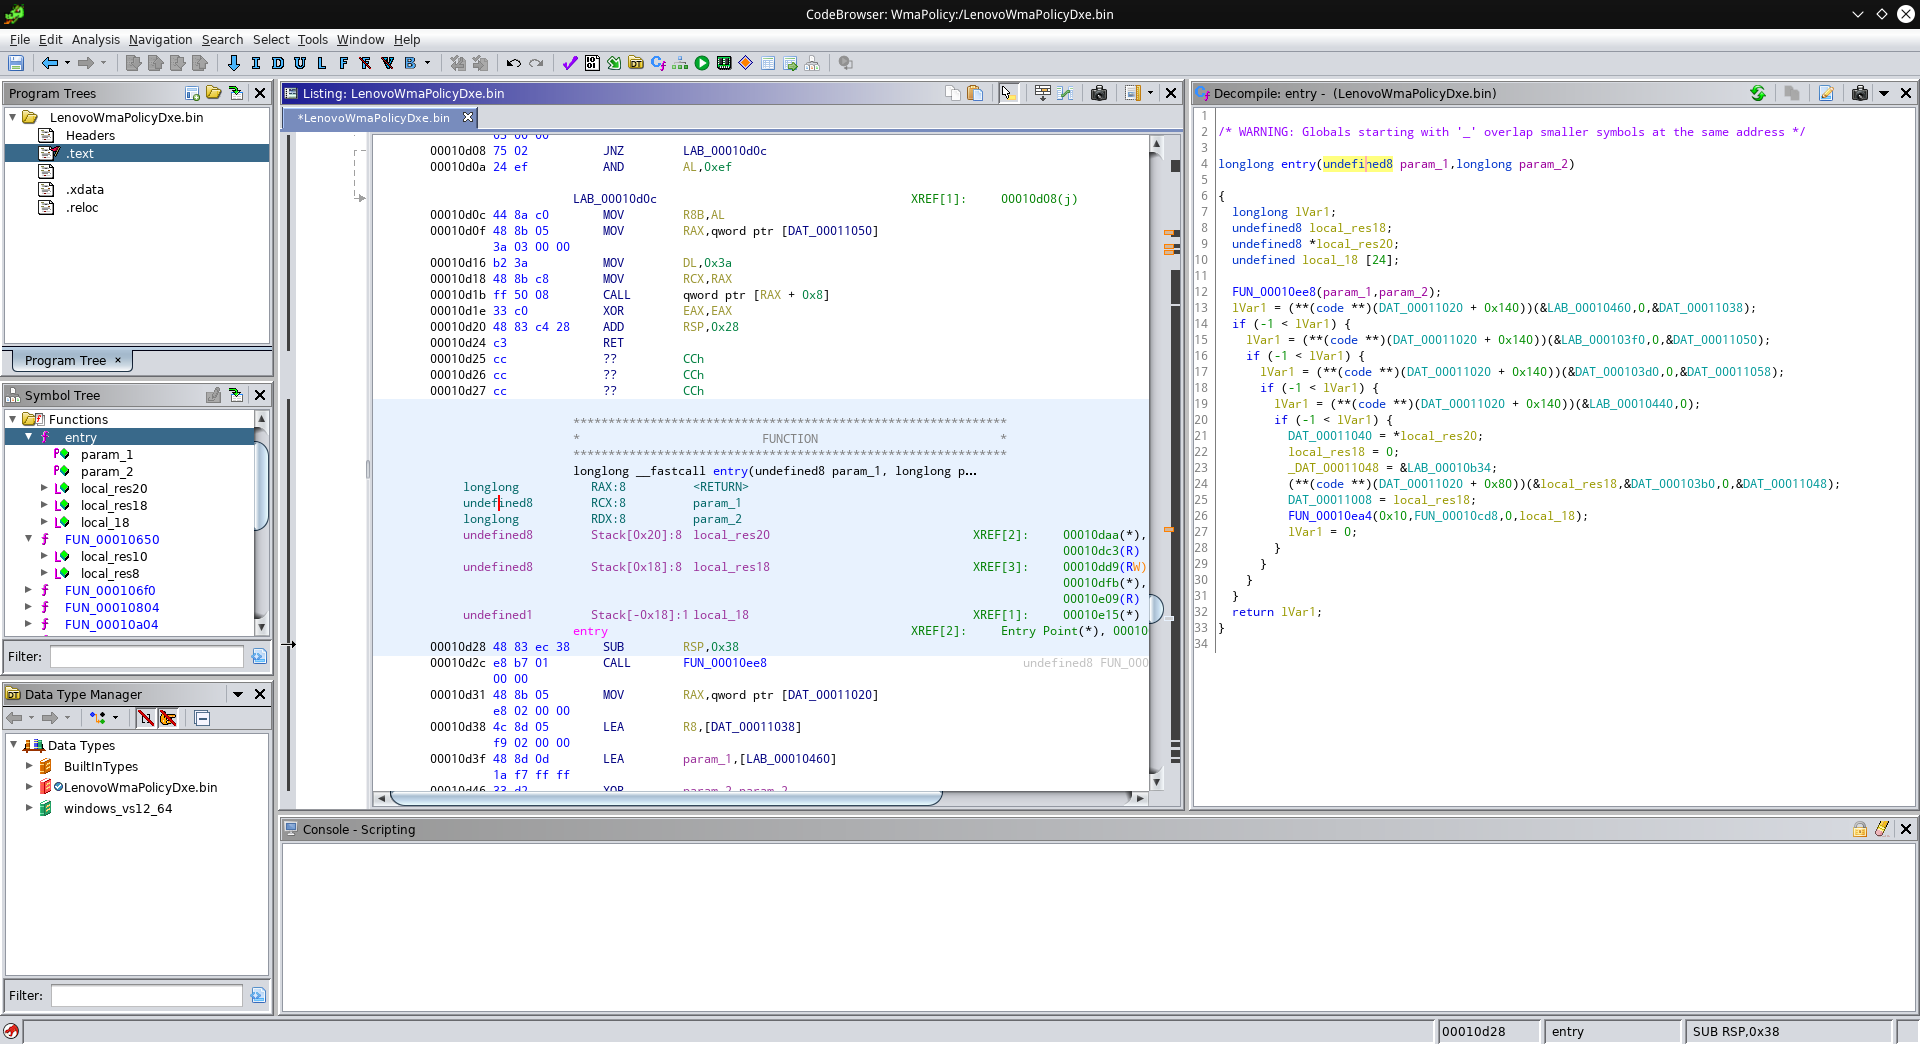
Oof, that doesn’t look easy to understand. But wait, Ghidra can help clean this mess up! Let us first take a look at how such an entry point of a UEFI module usually looks like (taken from here):
#include <efi.h>

EFI_STATUS main(EFI_HANDLE ImageHandle, EFI_SYSTEM_TABLE *SystemTable)
{
  return EFI_SUCCESS;
}
This gives us the information we need to give the parameters and return values of our entry point the proper types. In the assembly view, click into the line describing “param_1”, and press “T” to enter the type name “EFI_HANDLE”. Then press “L” to give it the name “ImageHandle”. Now, repeat this for the return value and the second parameter.
Now, double-click on that function call “FUN_00010ee8”.
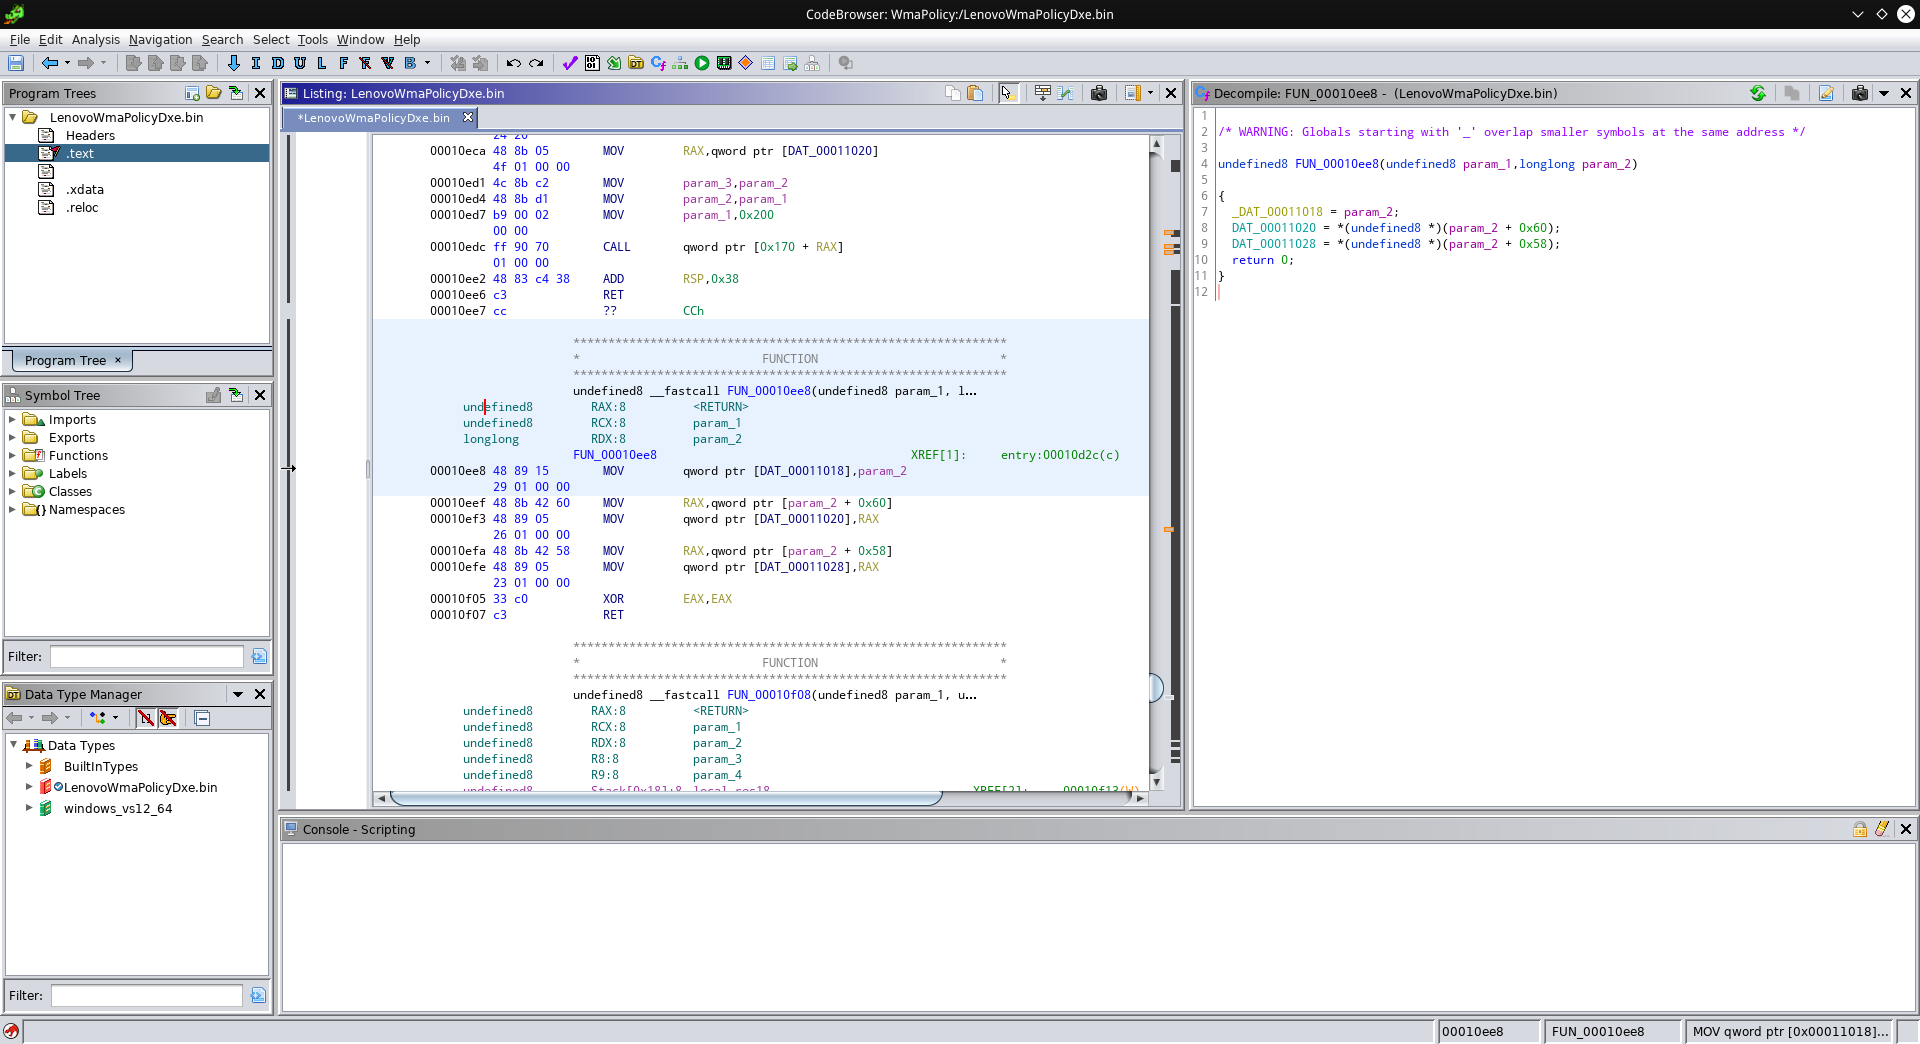
This functions just gets passed the same parameters as our entry point, so repeat this process here. Clearly this function just stores some pointers to global variables, so with a double-click on them, you can give them proper types and names too (hint: The back arrow in the top left can take you back to where you came from). Make sure to give that function a proper name, too (“L” can rename variables and functions), and the result should look something like this:
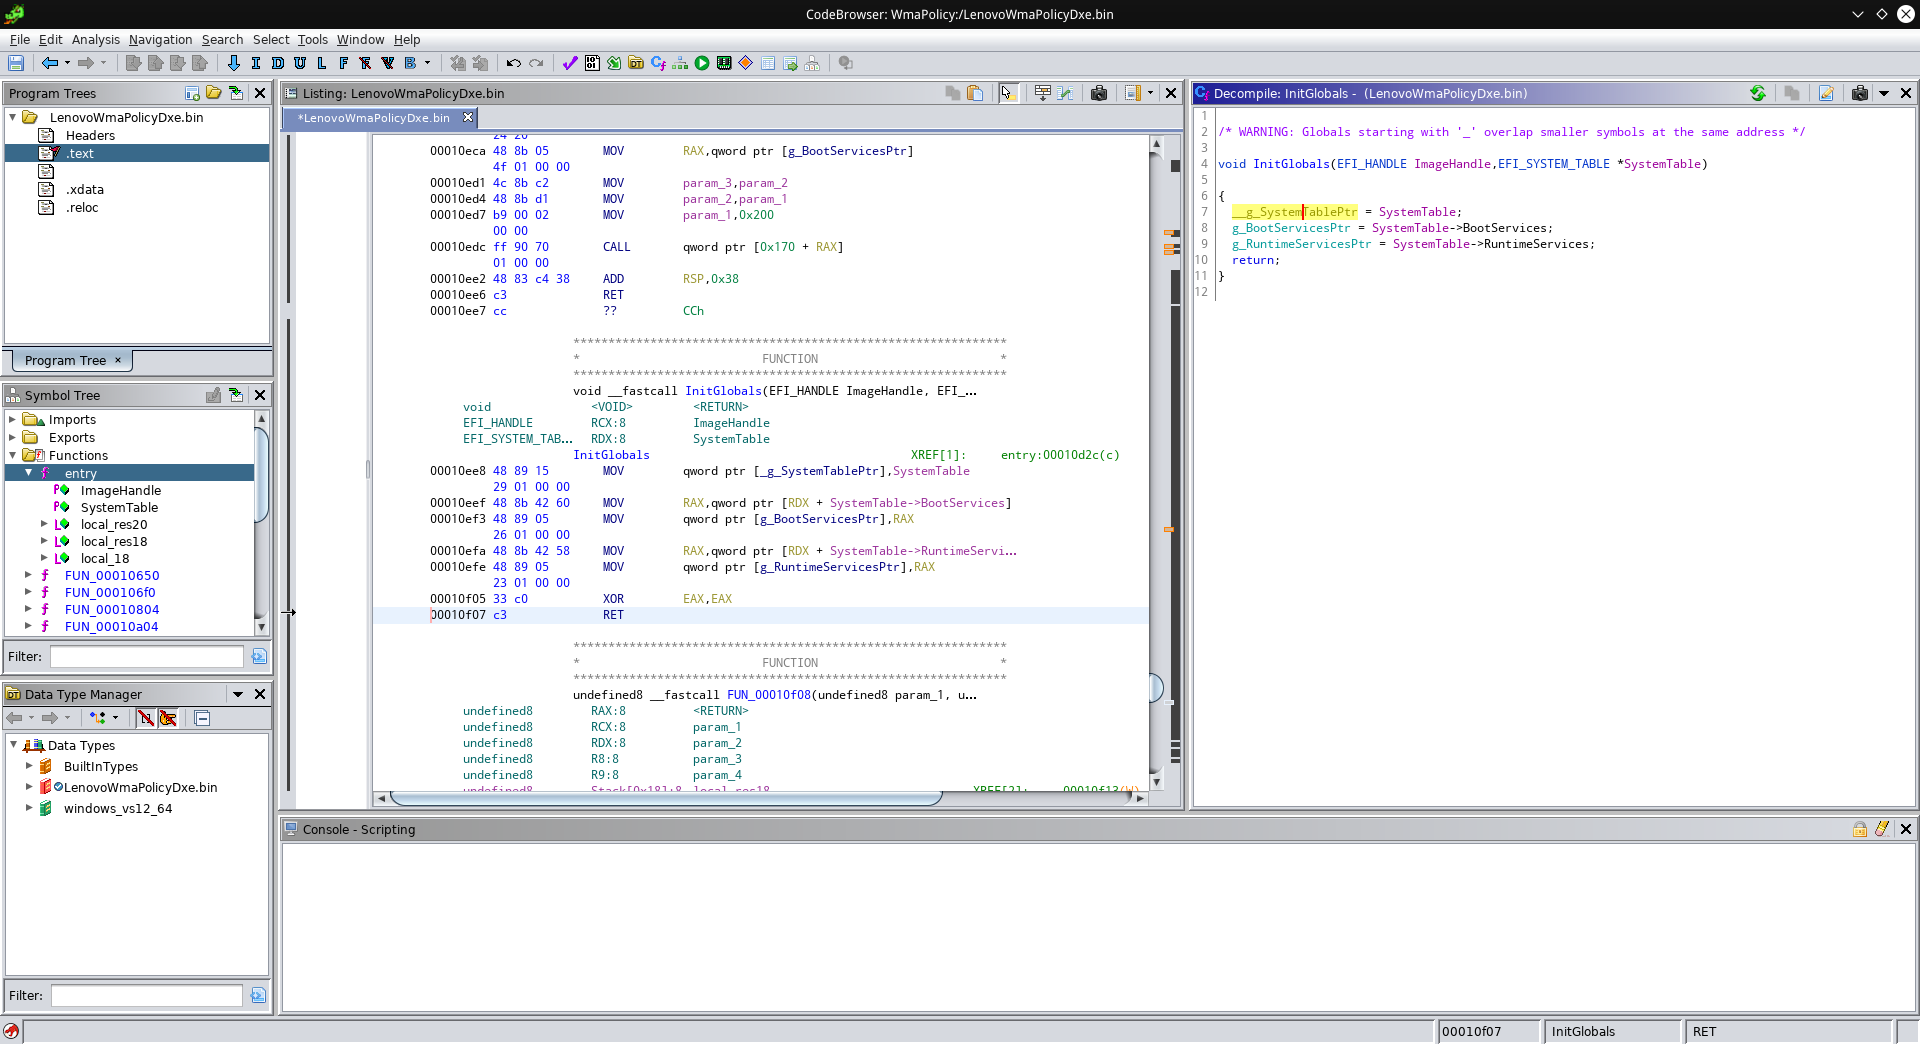
Now let’s look at our entry point again:
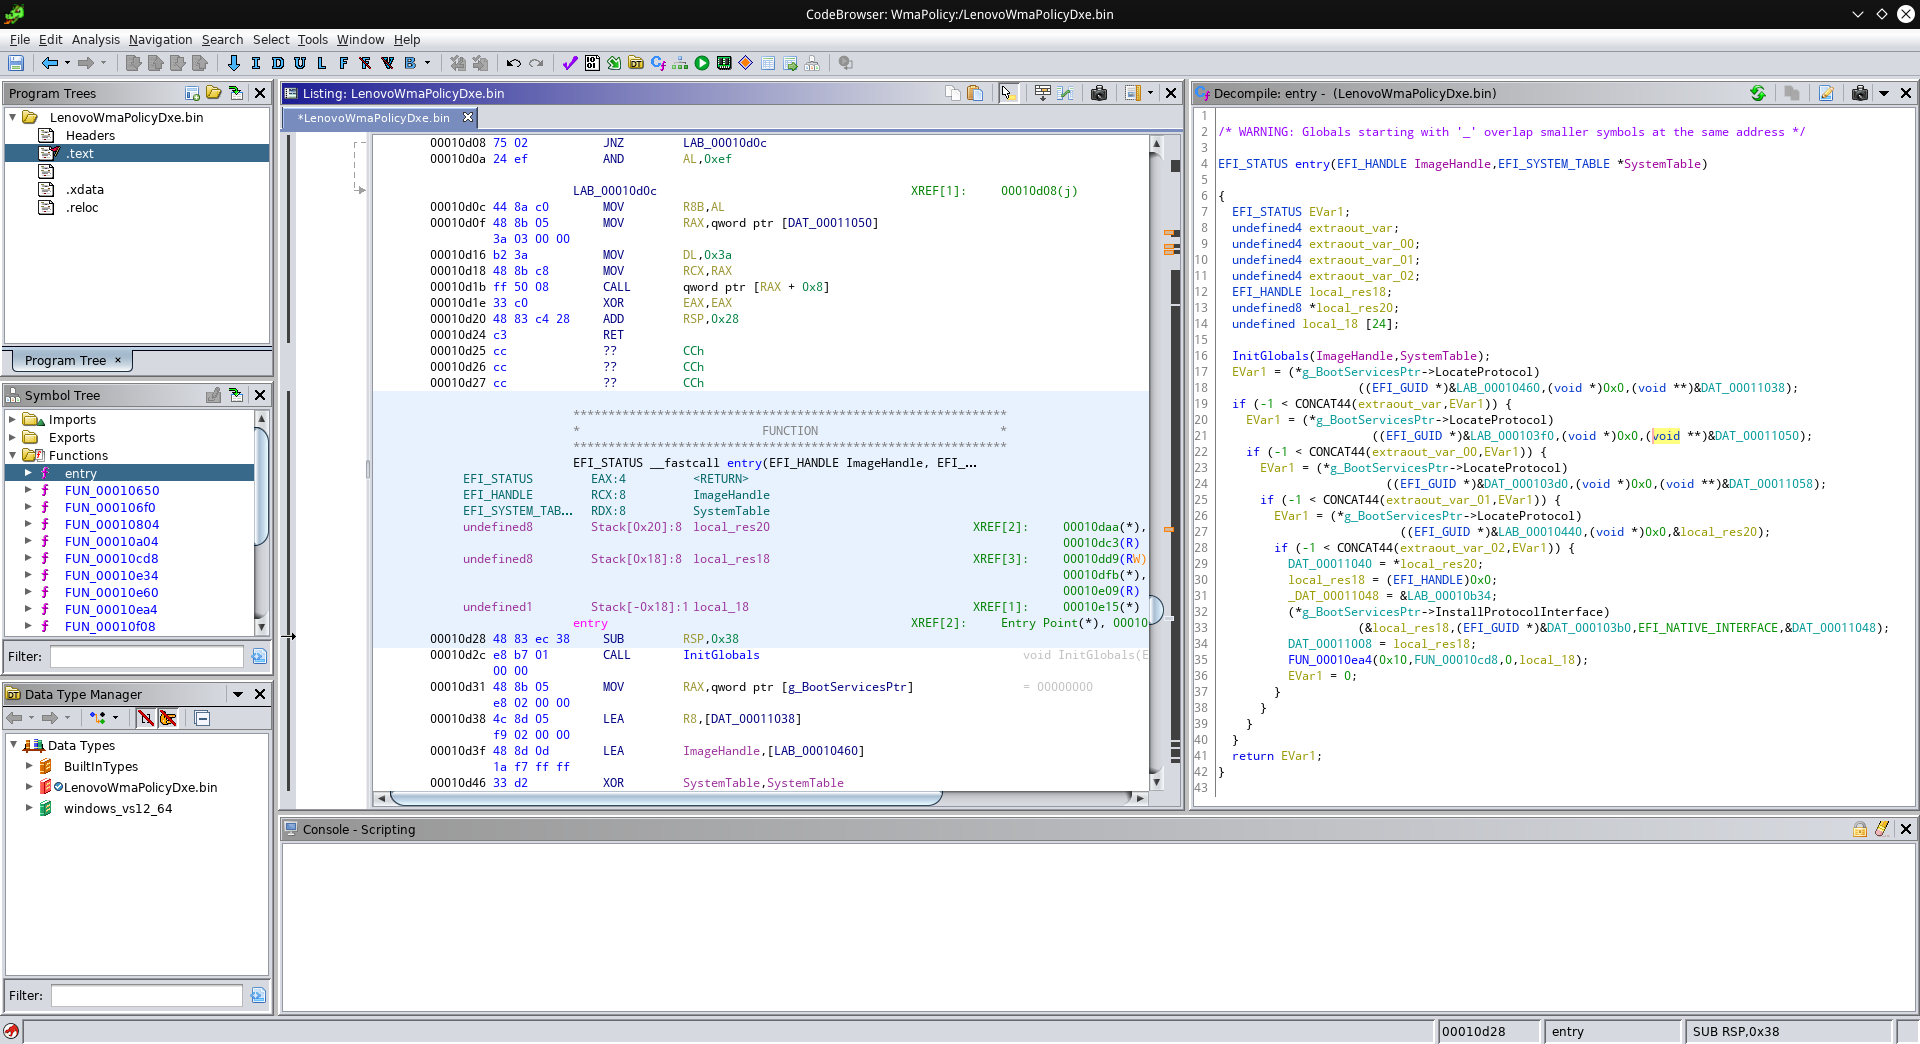
Whoa, that’s much better already! We can clearly see that our module is calling some “LocateProtocol” function four times, and then a function called “InstallProtocolInterface”. Both functions use GUIDs (globally unique identifier) - I didn’t bother to check where else these GUIDs show up, but I’m pretty sure that the GUID used with “InstallProtocolInterface” would show up in the modules requesting this module to check the whitelist! Clearly this registered interface must be where the magic happens, but from this registration itself, it wasn’t clear to me which function does the actualy checking. So let’s take a look around and inspect some of the other functions.
You may wonder what a “Boot Service” is. UEFI firmware provides certain services to firmware modules and operating systems. These services are grouped into two categories: Boot Services and Runtime Services. Runtime Services are available even when the operating system took over, while Boot Services are only available when the system boots and can not be used by the operating system. The transition between the boot and the runtime phase is handled by a firmware call named “ExitBootServices”
Old friends
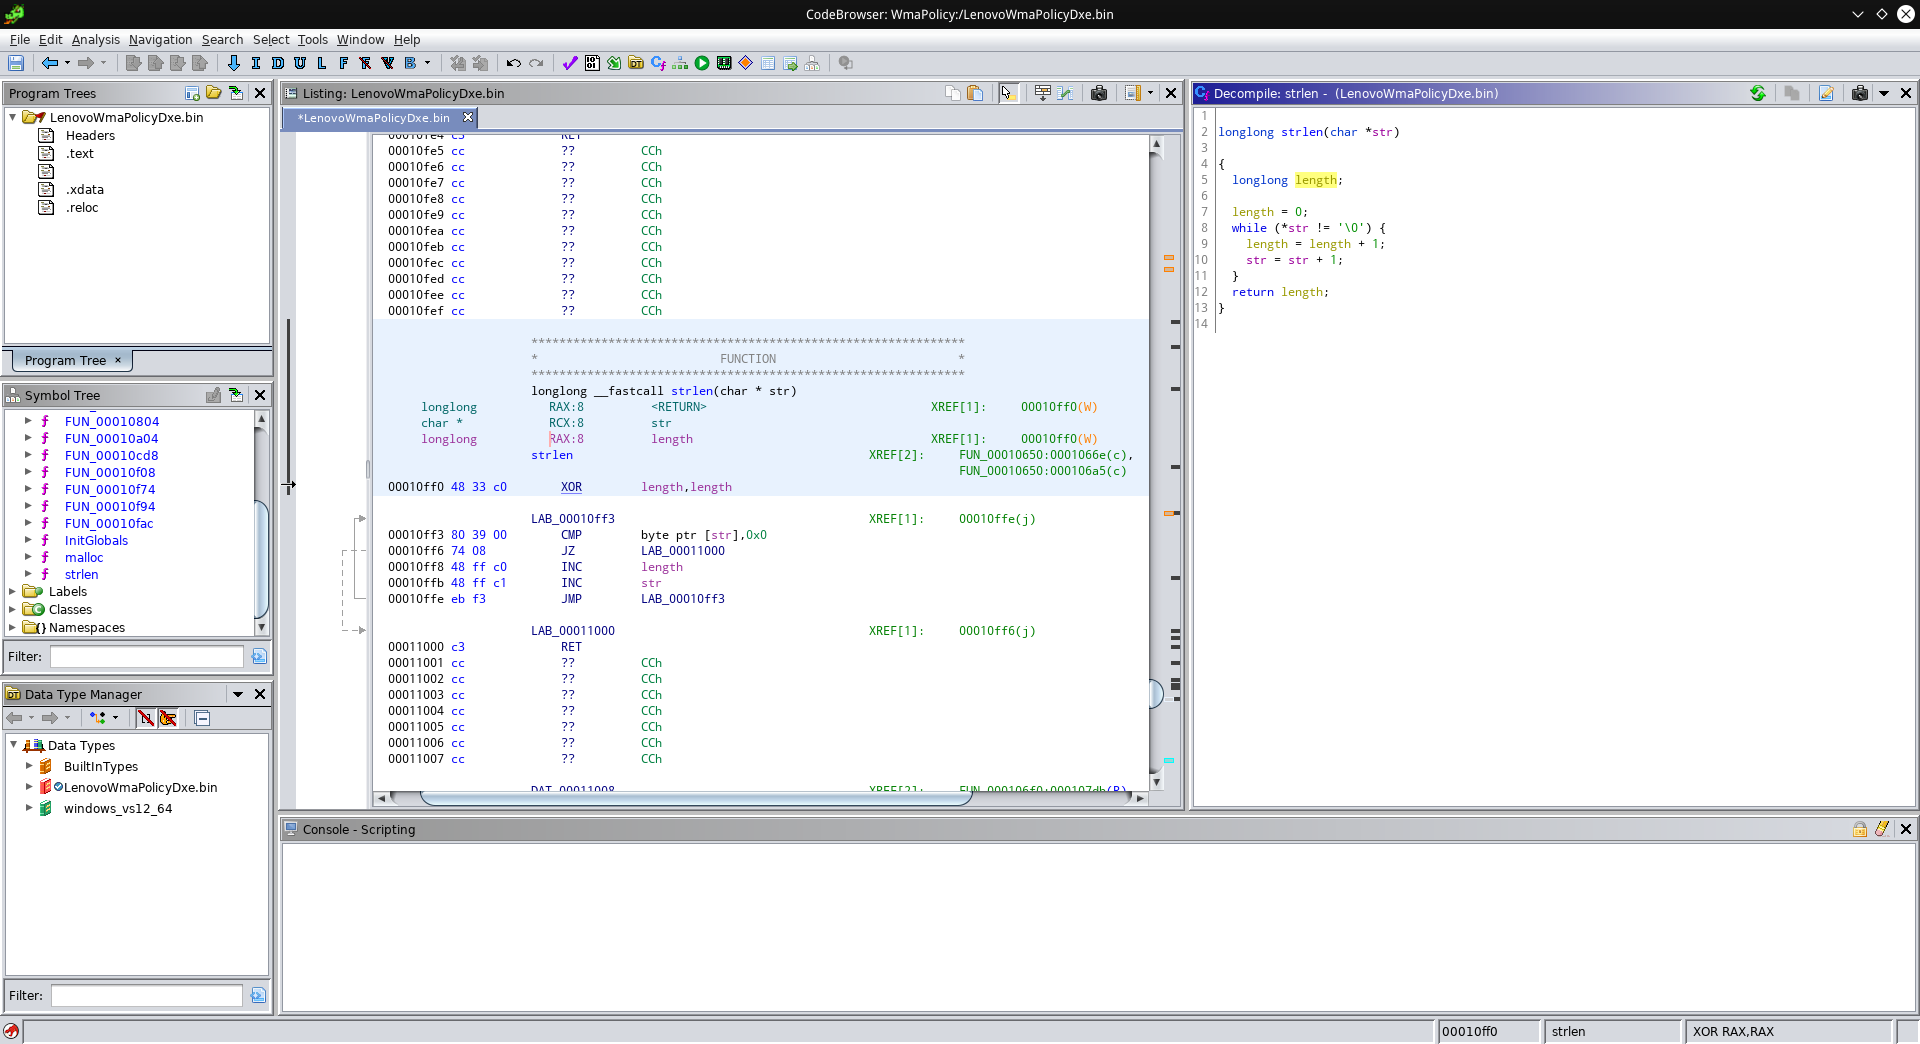
At this point I inspected the other functions that Ghidra found, in an attempt to clean up some of those weird function names. For example, take a look at the function at 0x10ff0: It has a variable that gets initialized to zero, compares a byte at the address it was passed against zero, and if it wasn’t zero, increments its internal variable and the pointer. Then it jumps to the beginning again. Seems familiar? Yep, this is strlen:
Let’s try this again! Check out FUN_00010f94:
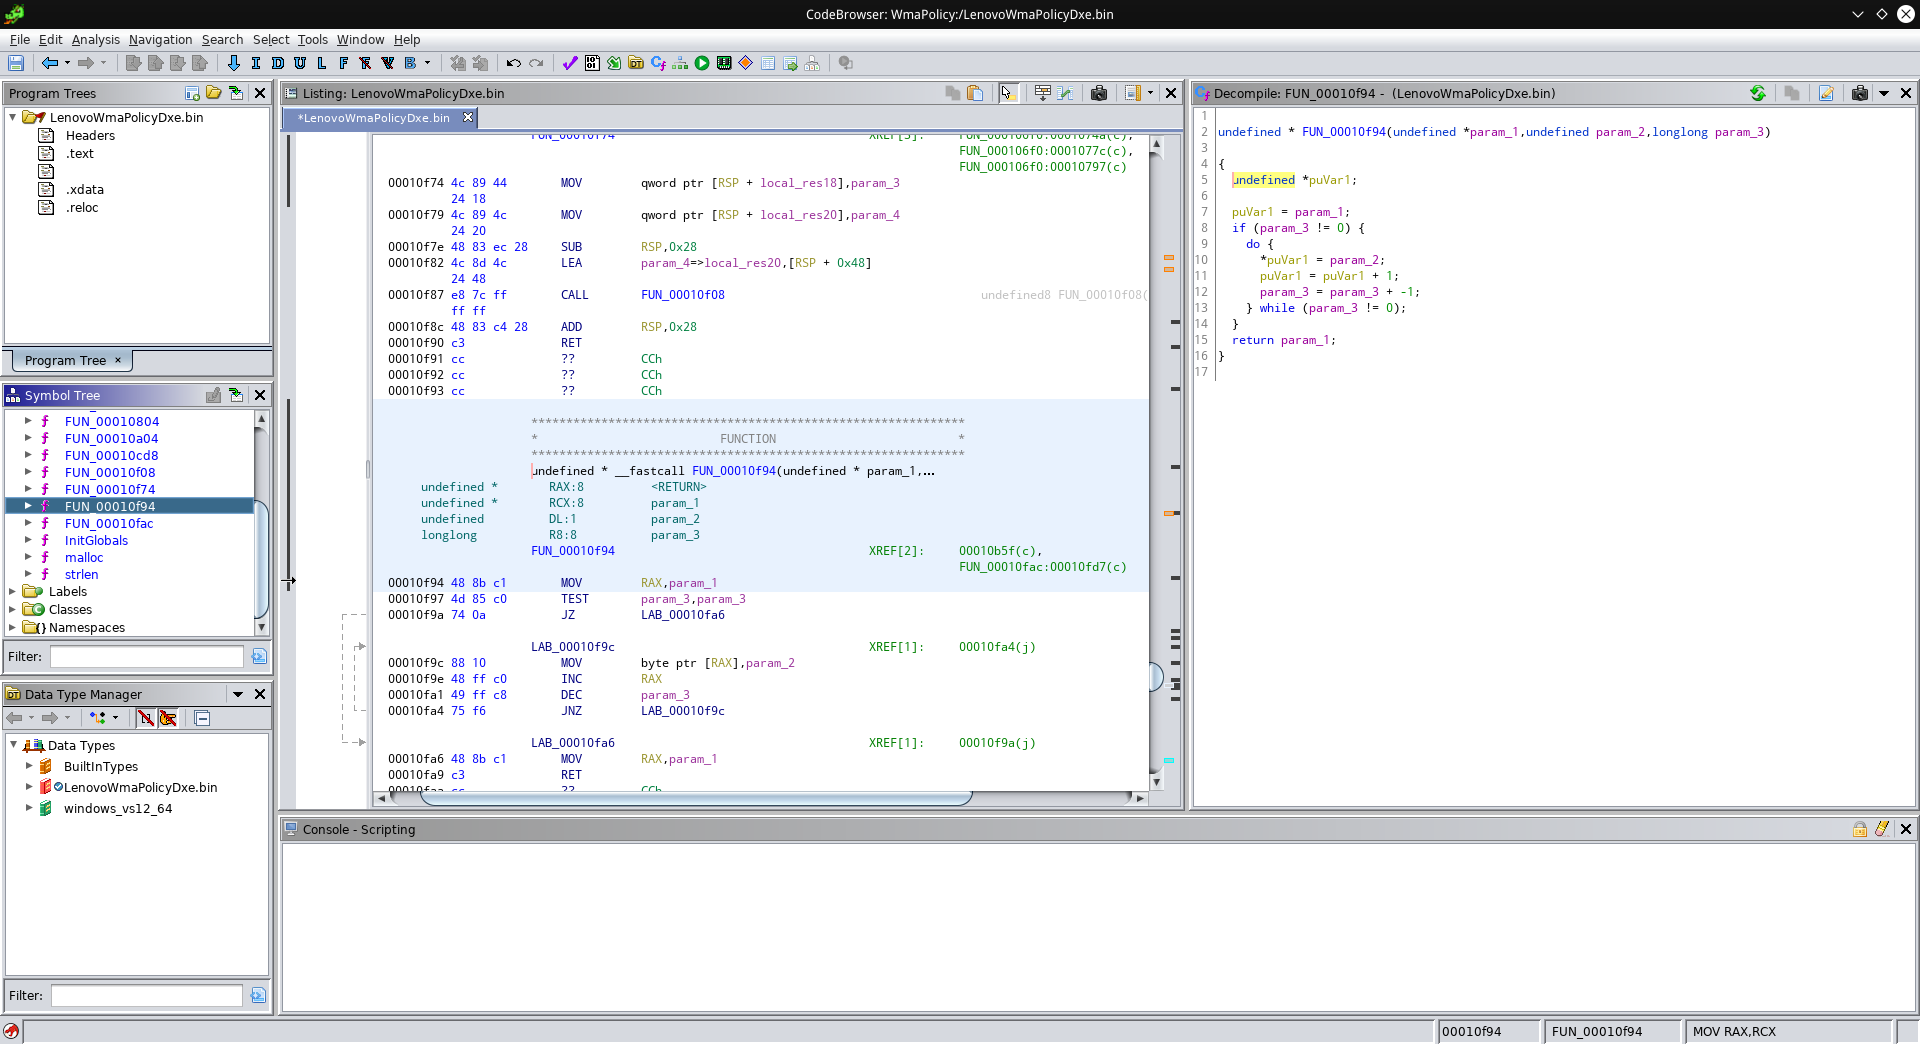
Ok, this one gets a pointer and two values. If the third parameter is not zero, the memory location our pointer points to gets set to the value of our second parameter. Our pointer then gets increment, the third parameter decremented, and this repeats until our third parameter becomes zero. In other words, param_3 count elements at param_1 get set to param_2. Sounds familiar?
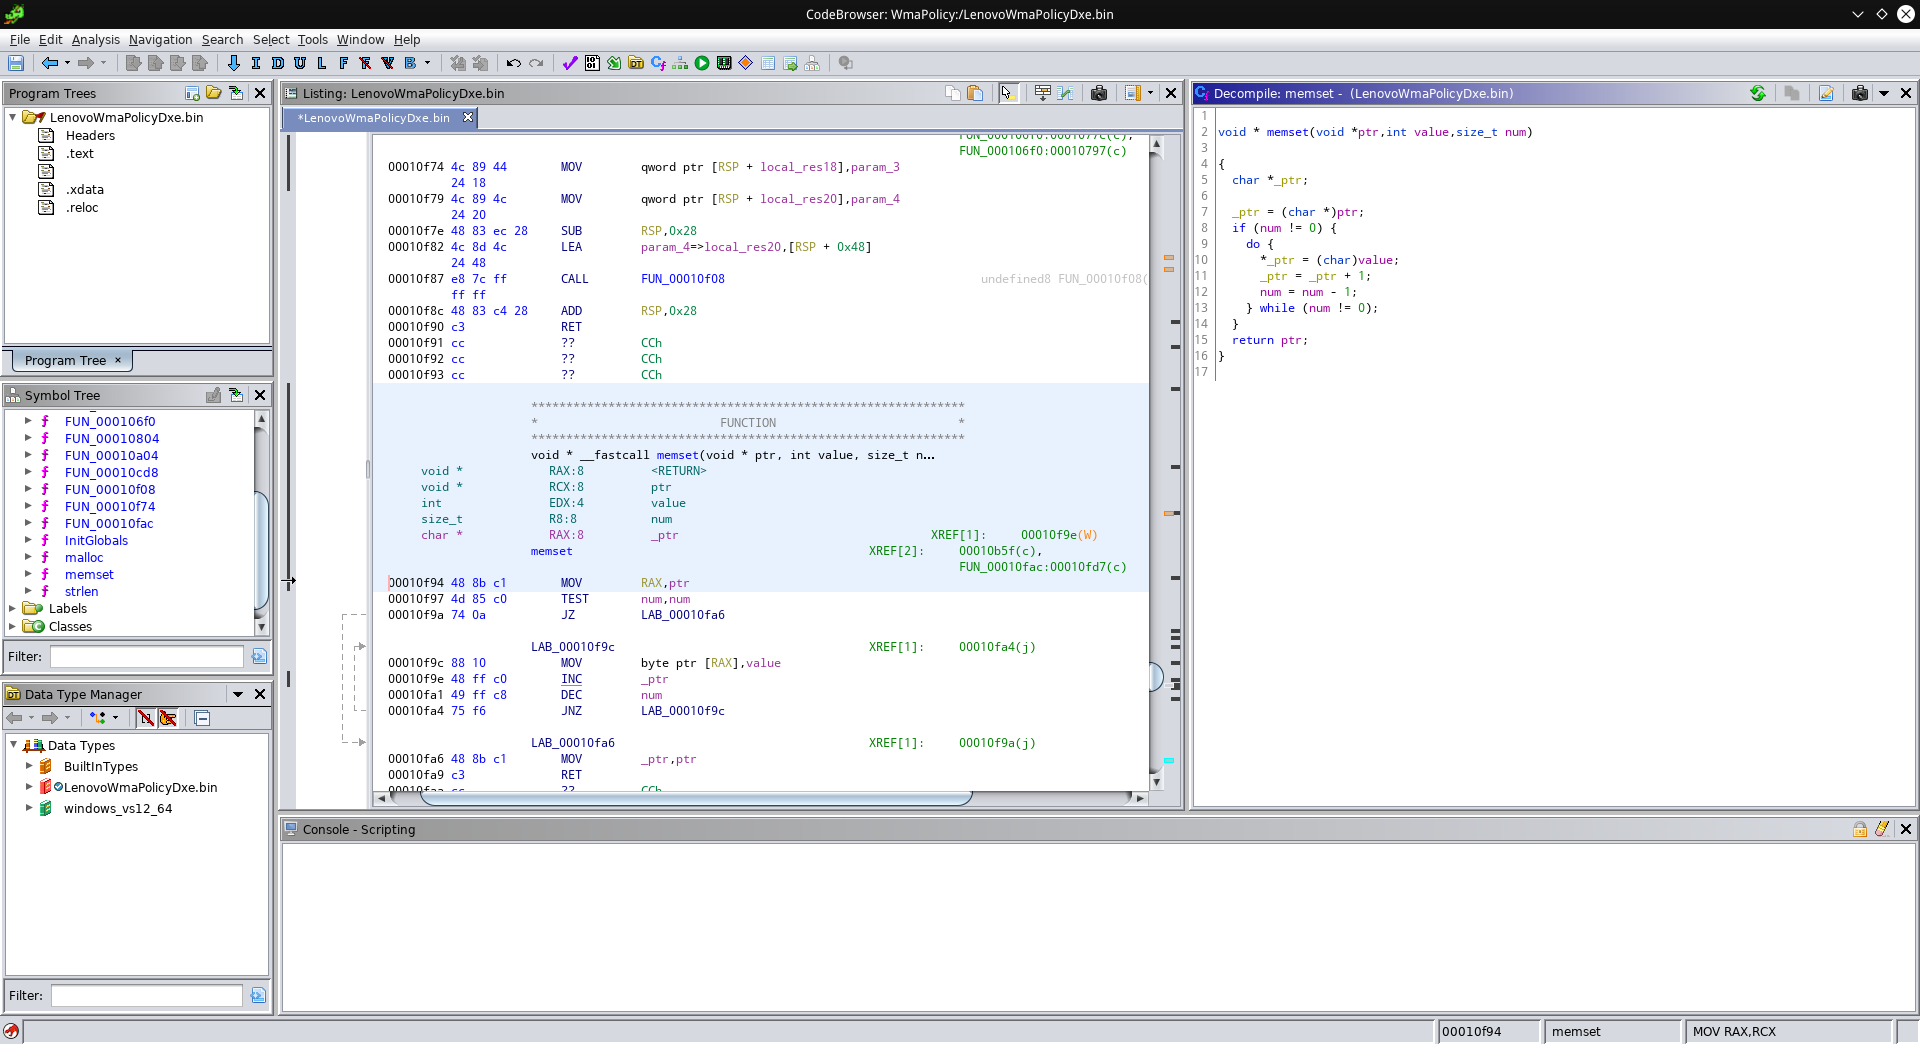
Yep, this is memset! What a difference proper names and types can make. There are a few more standard functions, and some custom ones for which I made up my own names. This is the list of names and addresses I ended up with:
| Name | Address |
|---|---|
| AllocatePool | 00010e34 |
| checkAgainstWhitelist | 00010804 |
| CreateEvent | 00010ea4 |
| InitGlobals | 00010ee8 |
| malloc | 00010e60 |
| memset | 00010f94 |
| printError | 000106f0 |
| snprintf | 00010f74 |
| strlen | 00010ff0 |
| strncpy | 00010fac |
| vsnprintf | 00010f08 |
Cutting to the chase
If you’ve paid attention so far, you may wonder what the “printError” and “checkAgainstWhitelist” functions do that appear in my table. Let’s take a look at printError:
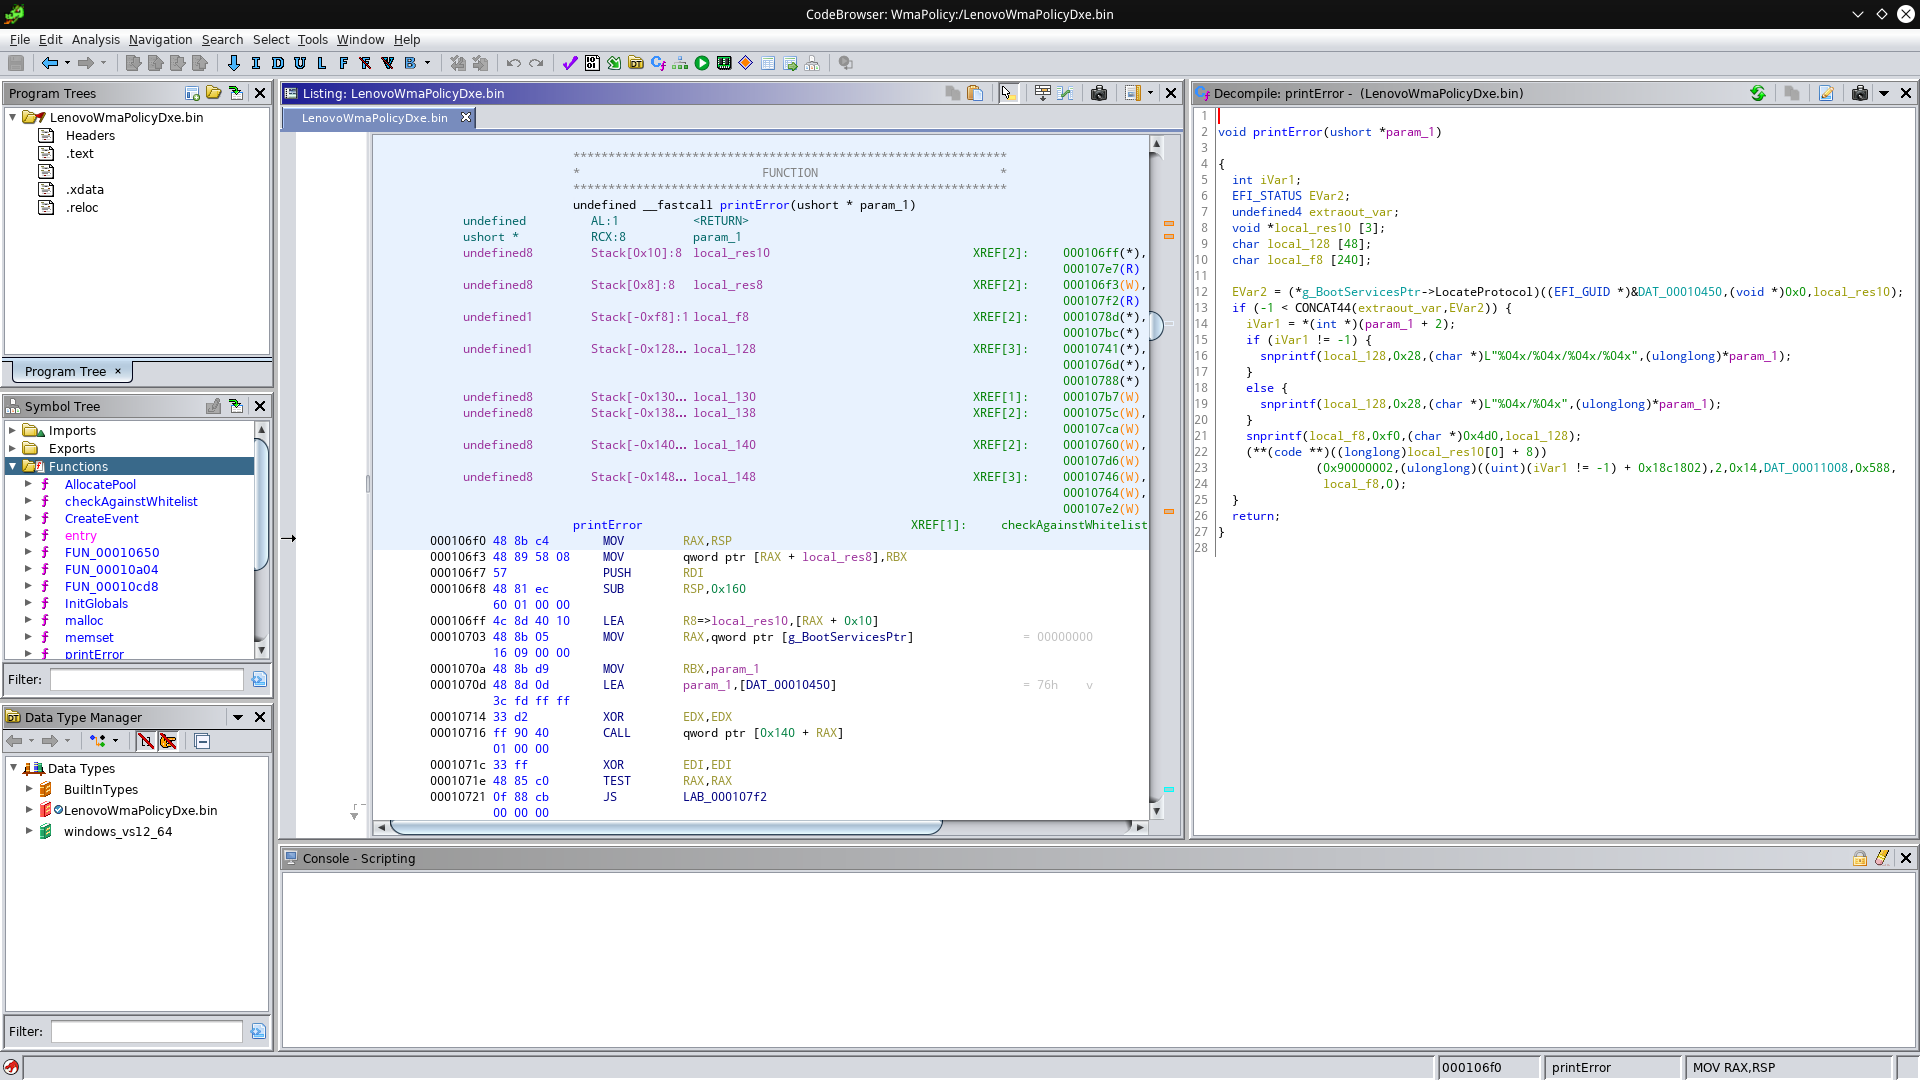
If you’re familiar with format strings (like used by printf) you’ll know what “%04x” means: It prints a four-digit zero-padded number in hexadecimal. Still remember that error message in the first picture? If you ask me, these format strings look like they’re producing the number part of that message. Now let’s take a look at the third snprintf - it looks kinda weird, what memory address is 0x4d0? Let’s check 0x000104d0:

Bingo, this is where the error messsage comes from! Now you can see why I named this function printError. But how does this help us find the whitelist check? The magic word is “XREF”. You may have seen this word appear in the disassembly window, and it always comes with a name or memory address next to it. This address next to it is a place where the location we’re looking at was referenced. Armed with this information, we can see that printError is referenced exactly once. Double-click on the xref to see where it’s referenced:
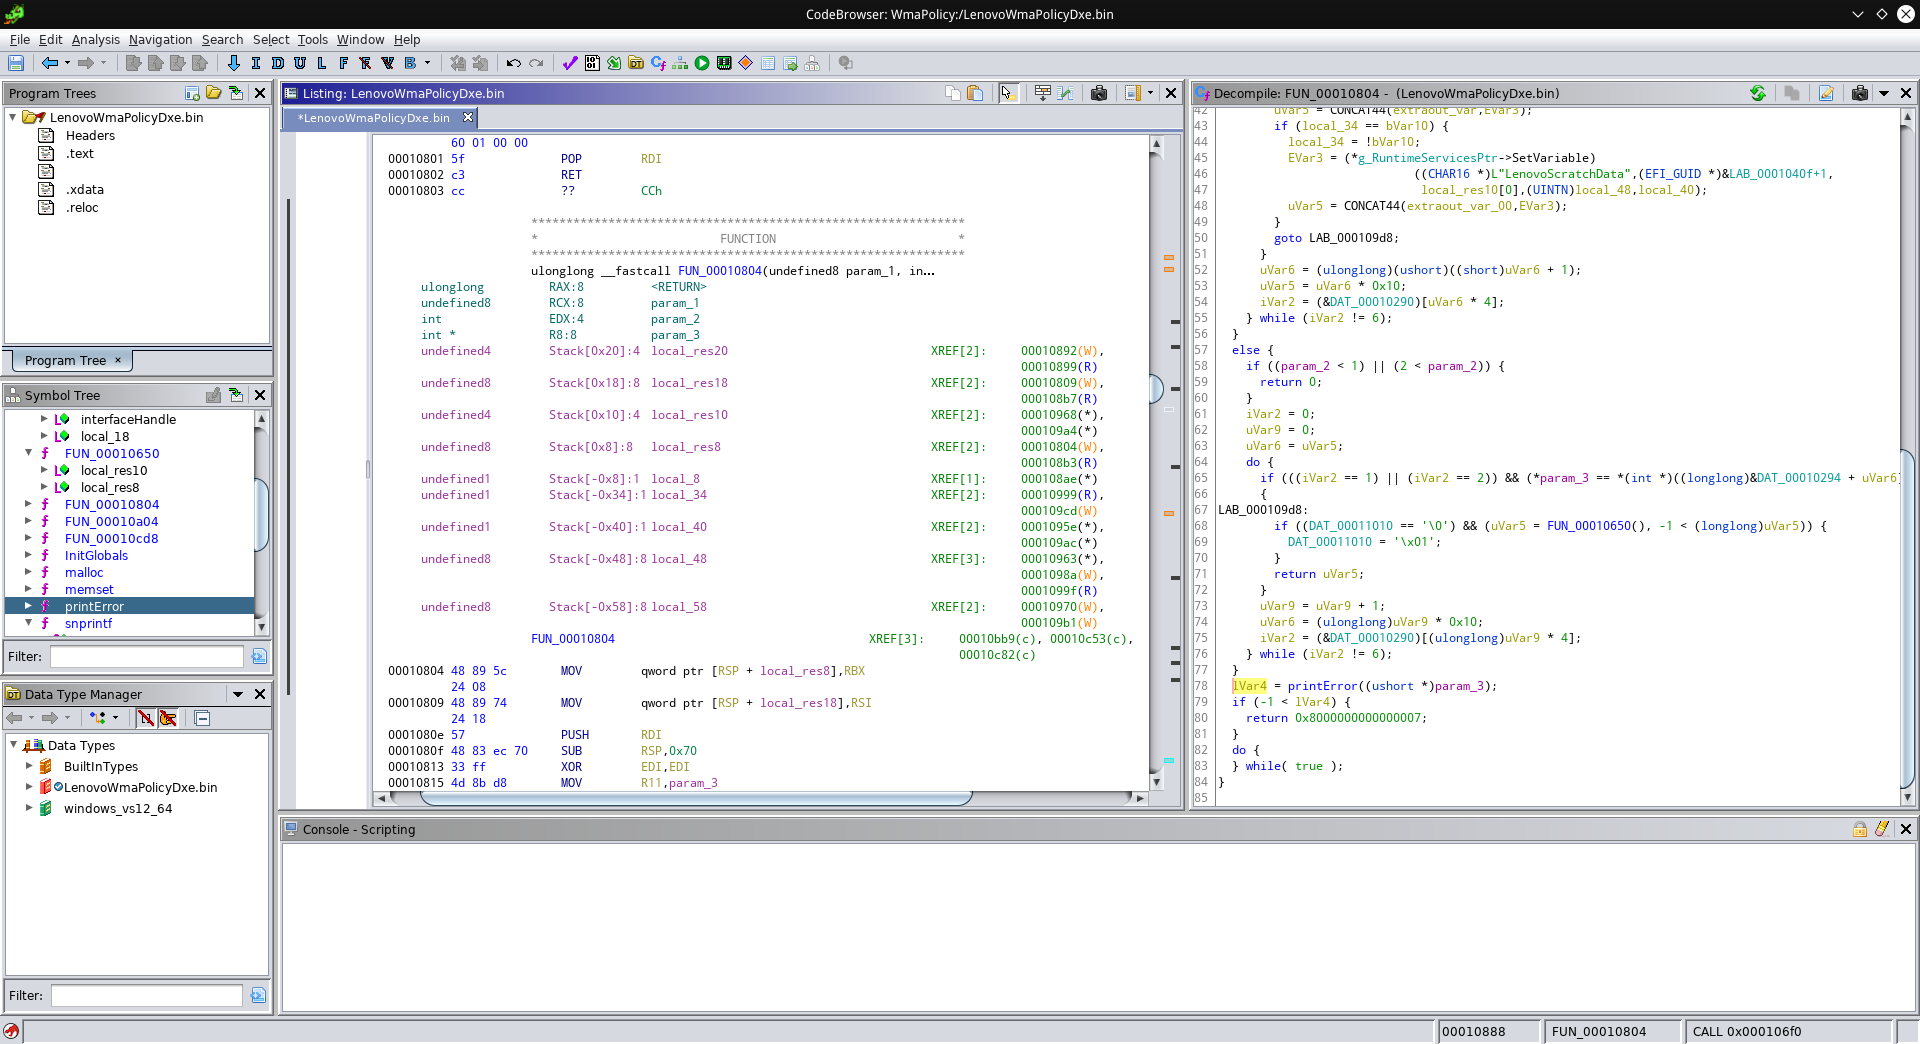
Taking a closer look, this part looks interesting:
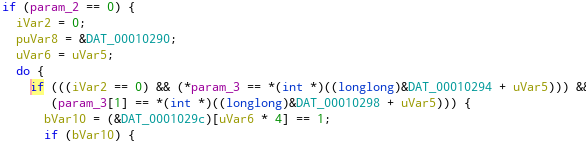
Yep, DAT_00010290 is where the whitelist starts! If you want, you can teach Ghidra the structure of this whitelist:
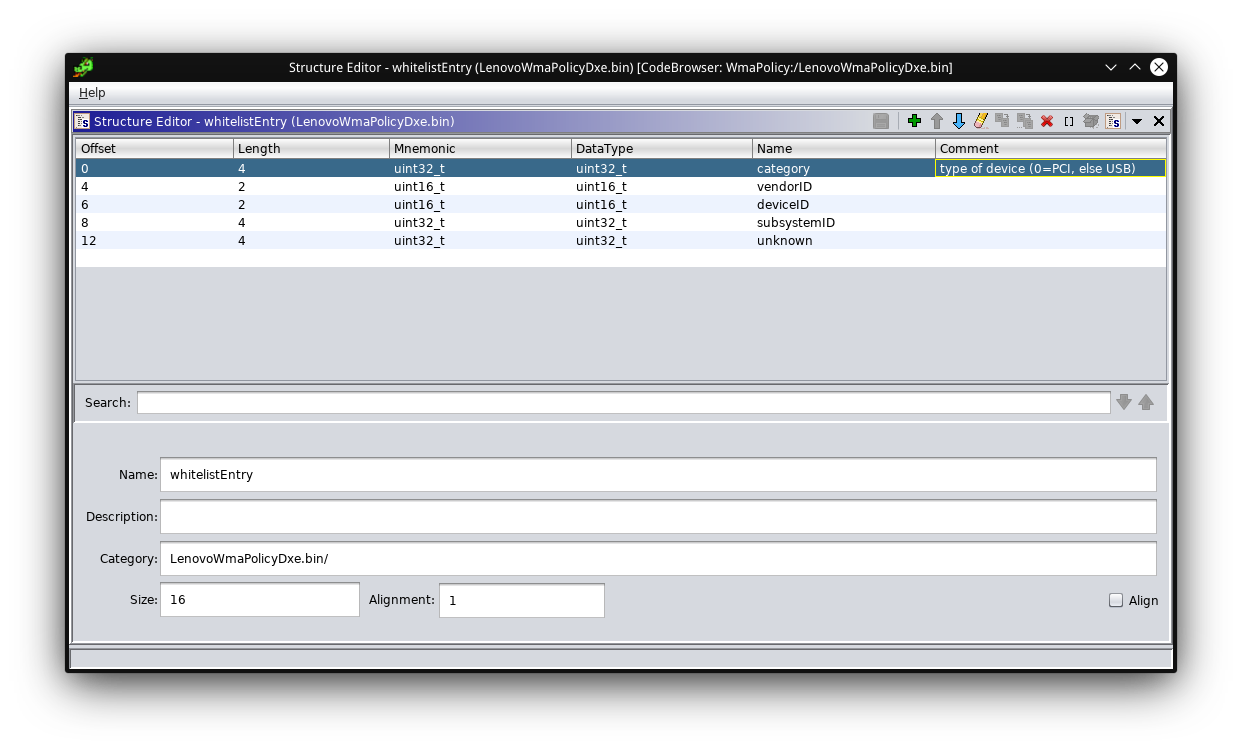
This will allow you to enter the type “whitelistEntry” when pressing “T” to assign a type. Ghidra even allows to mark areas of memory as an array by marking the memory, right-clicking and selecting “Data”->”Create Array…”. Just make sure to only mark the memory from the beginning of the whitelist up to the entry that starts with 6 (category=6 marks the end of the whitelist).
Slaying the dragon
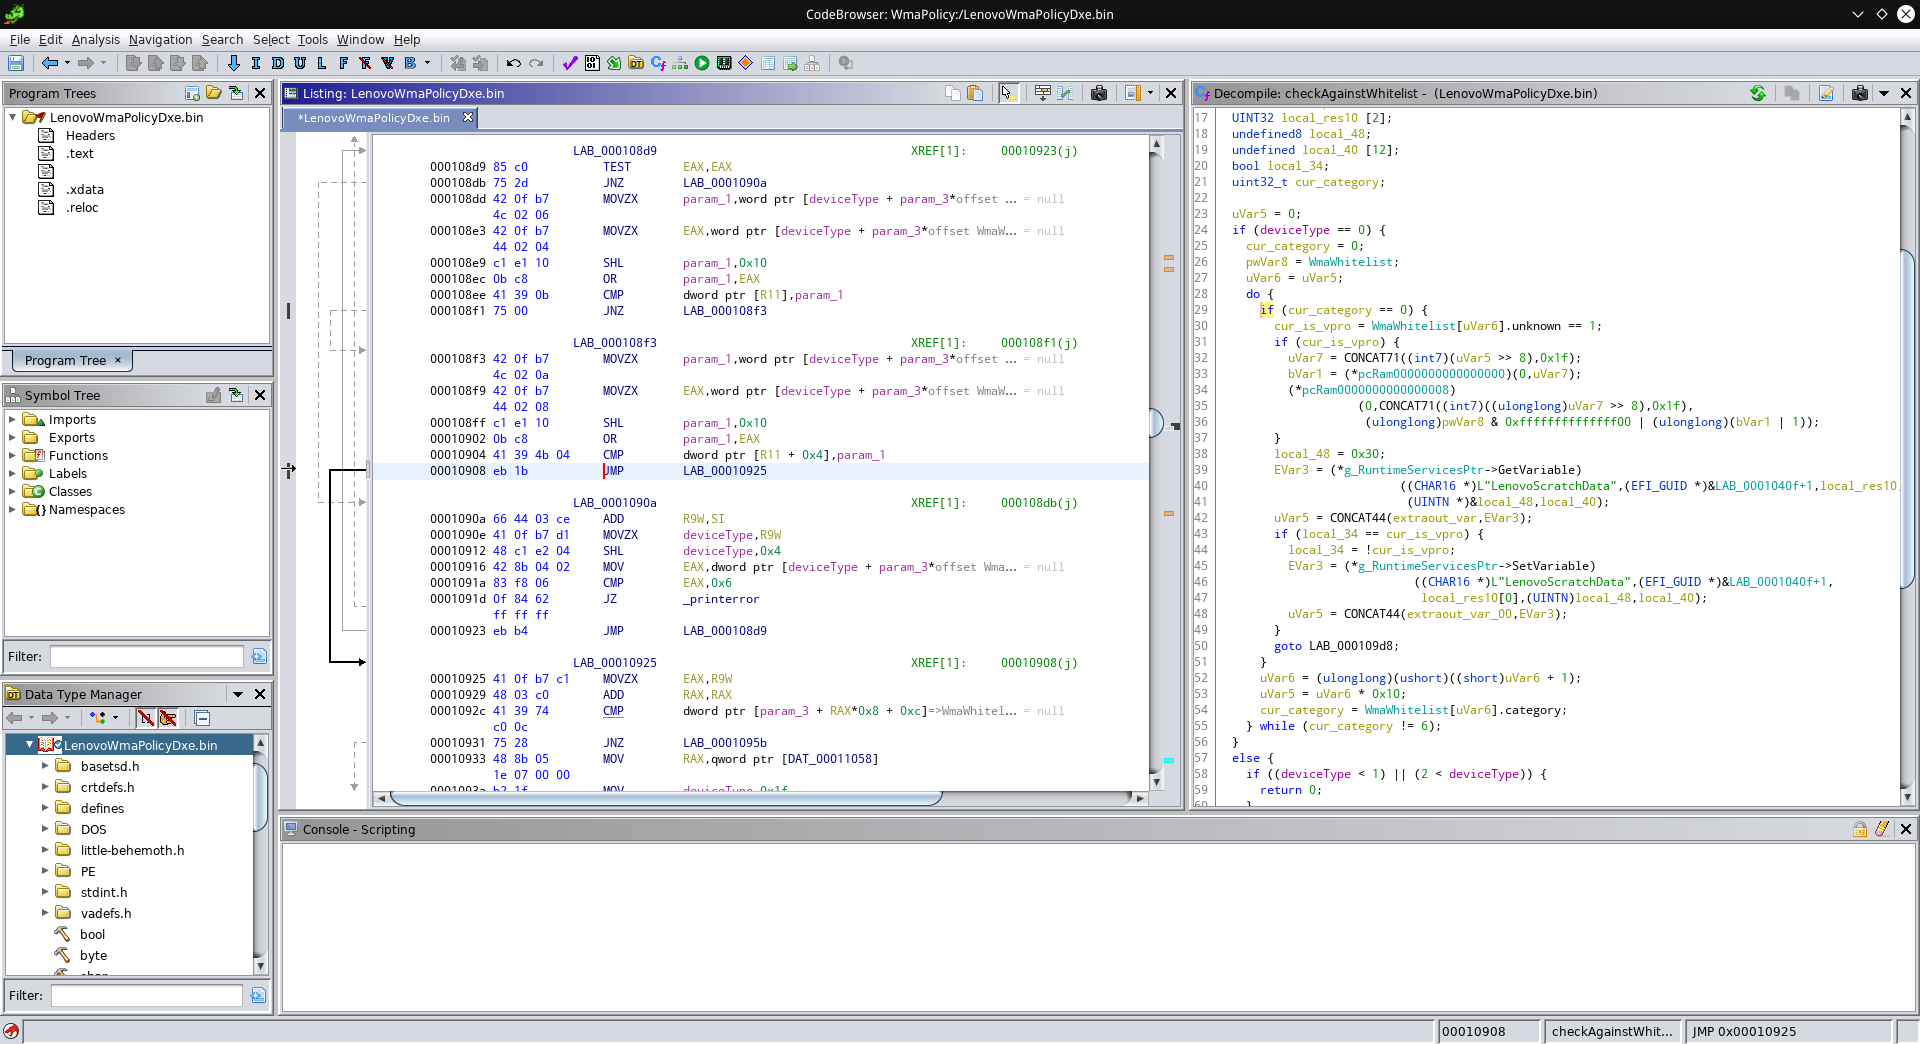
There are multiple ways to eliminate the problem. After issues with my initial approach, I decided to just patch out the ID comparisons. There are three comparisons to patch, let’s check out the first:
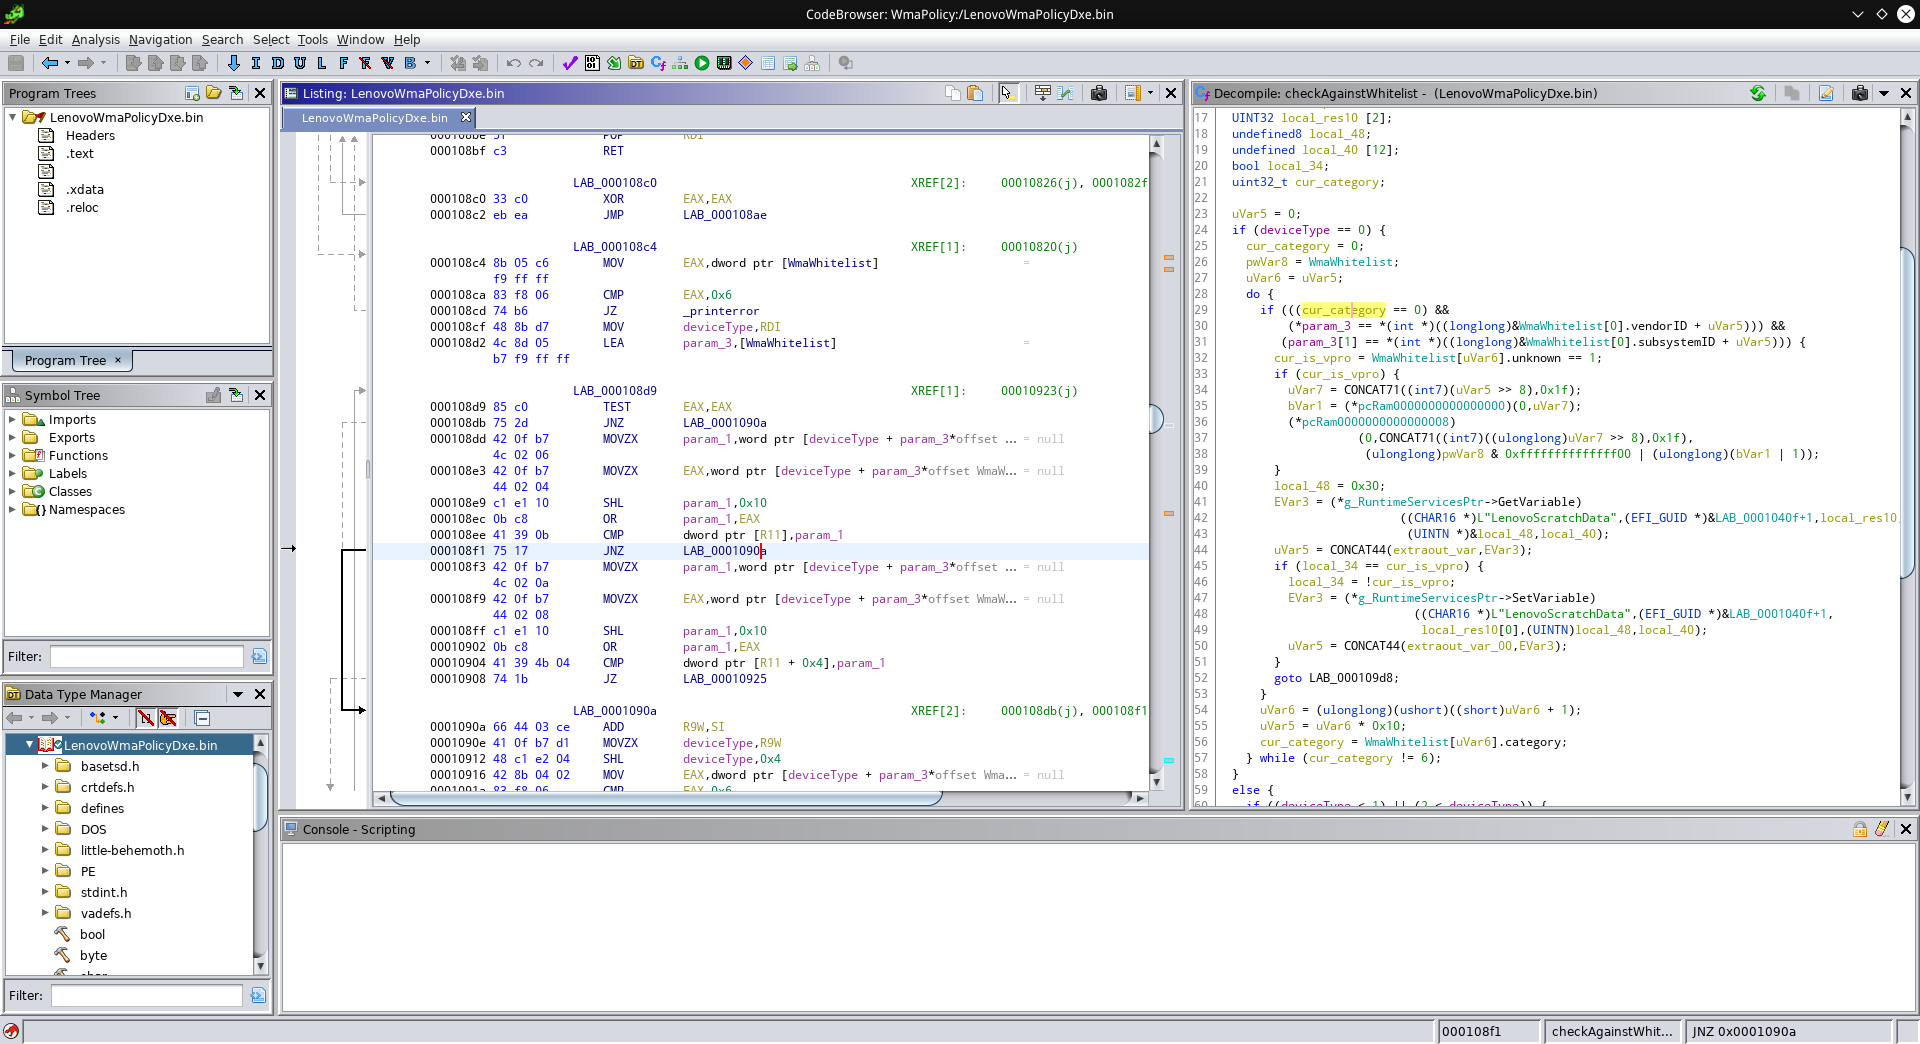
The selected assembly instruction is the jump that gets executed when the comparison of PCI vendor ID and device ID fails. With a right-click and selecting “Patch Instruction”, we can just change the address of the jump, so that, no matter the result of the comparison, execution always continues at 0x108f1:
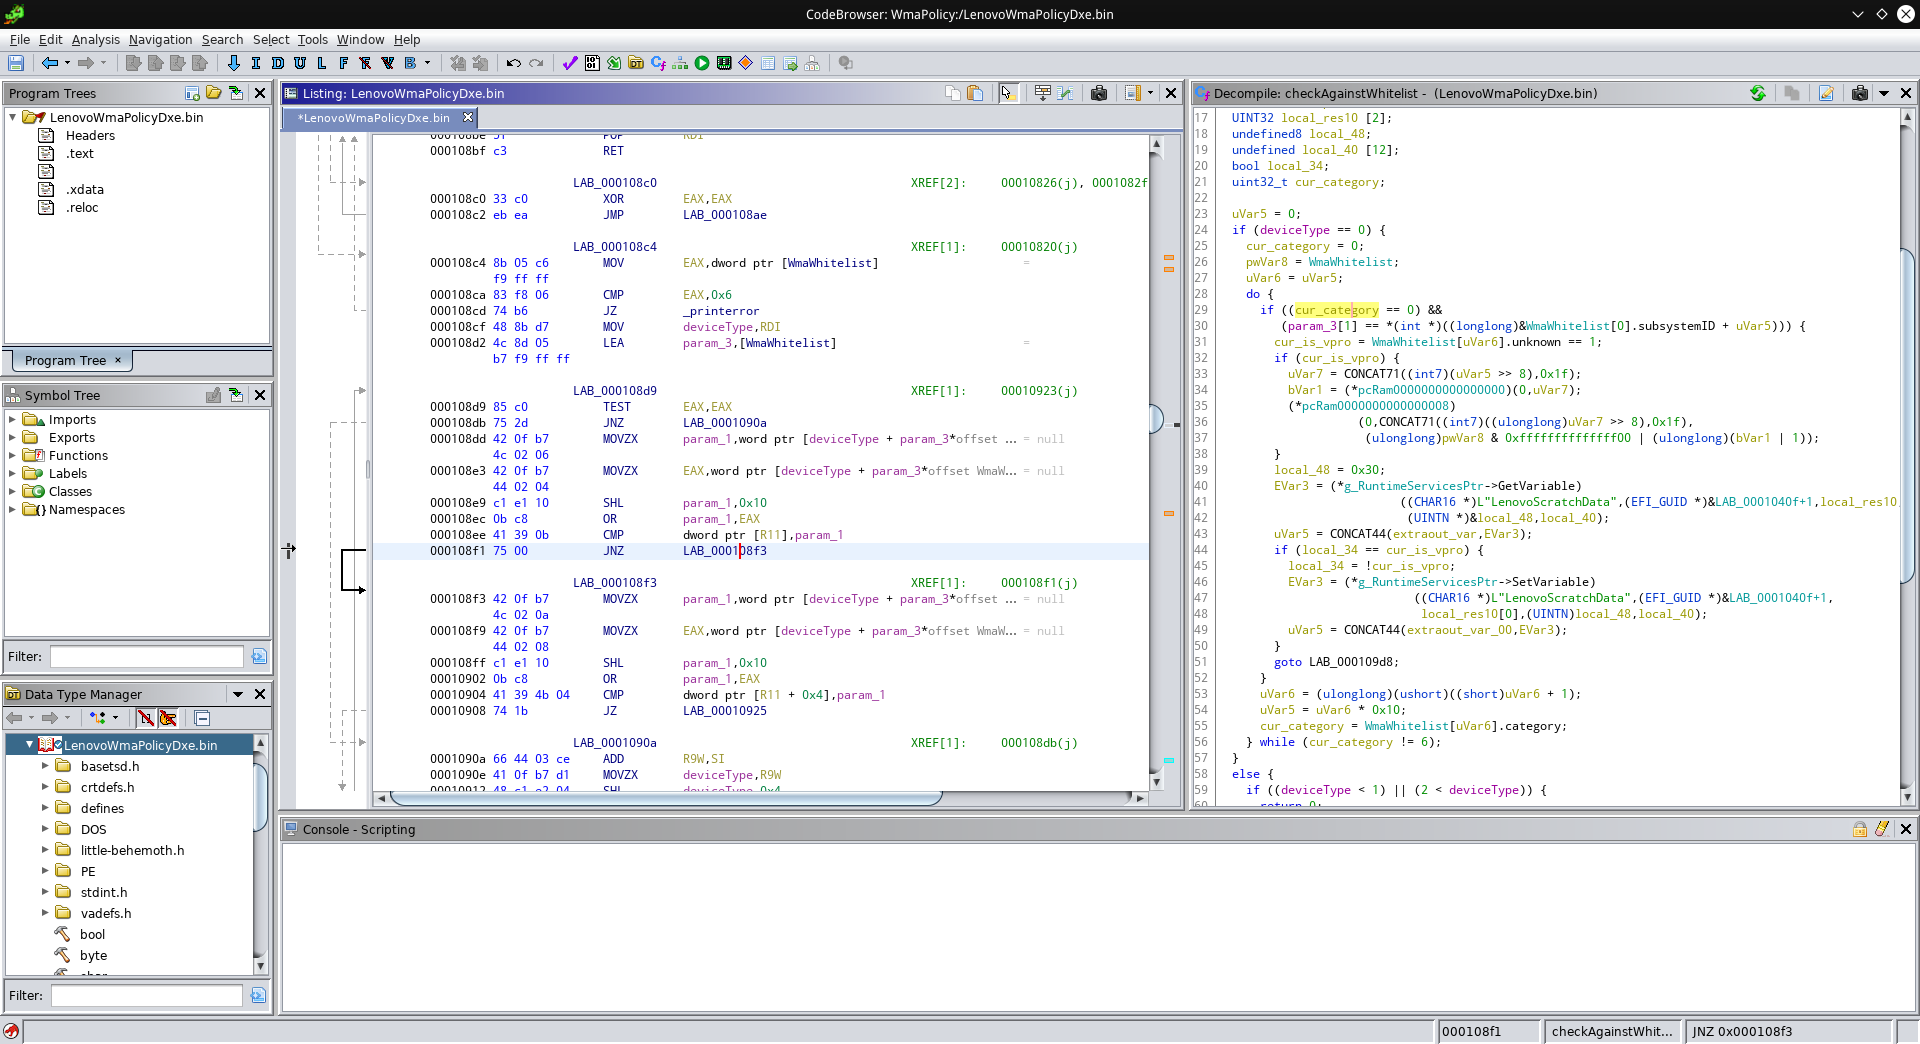
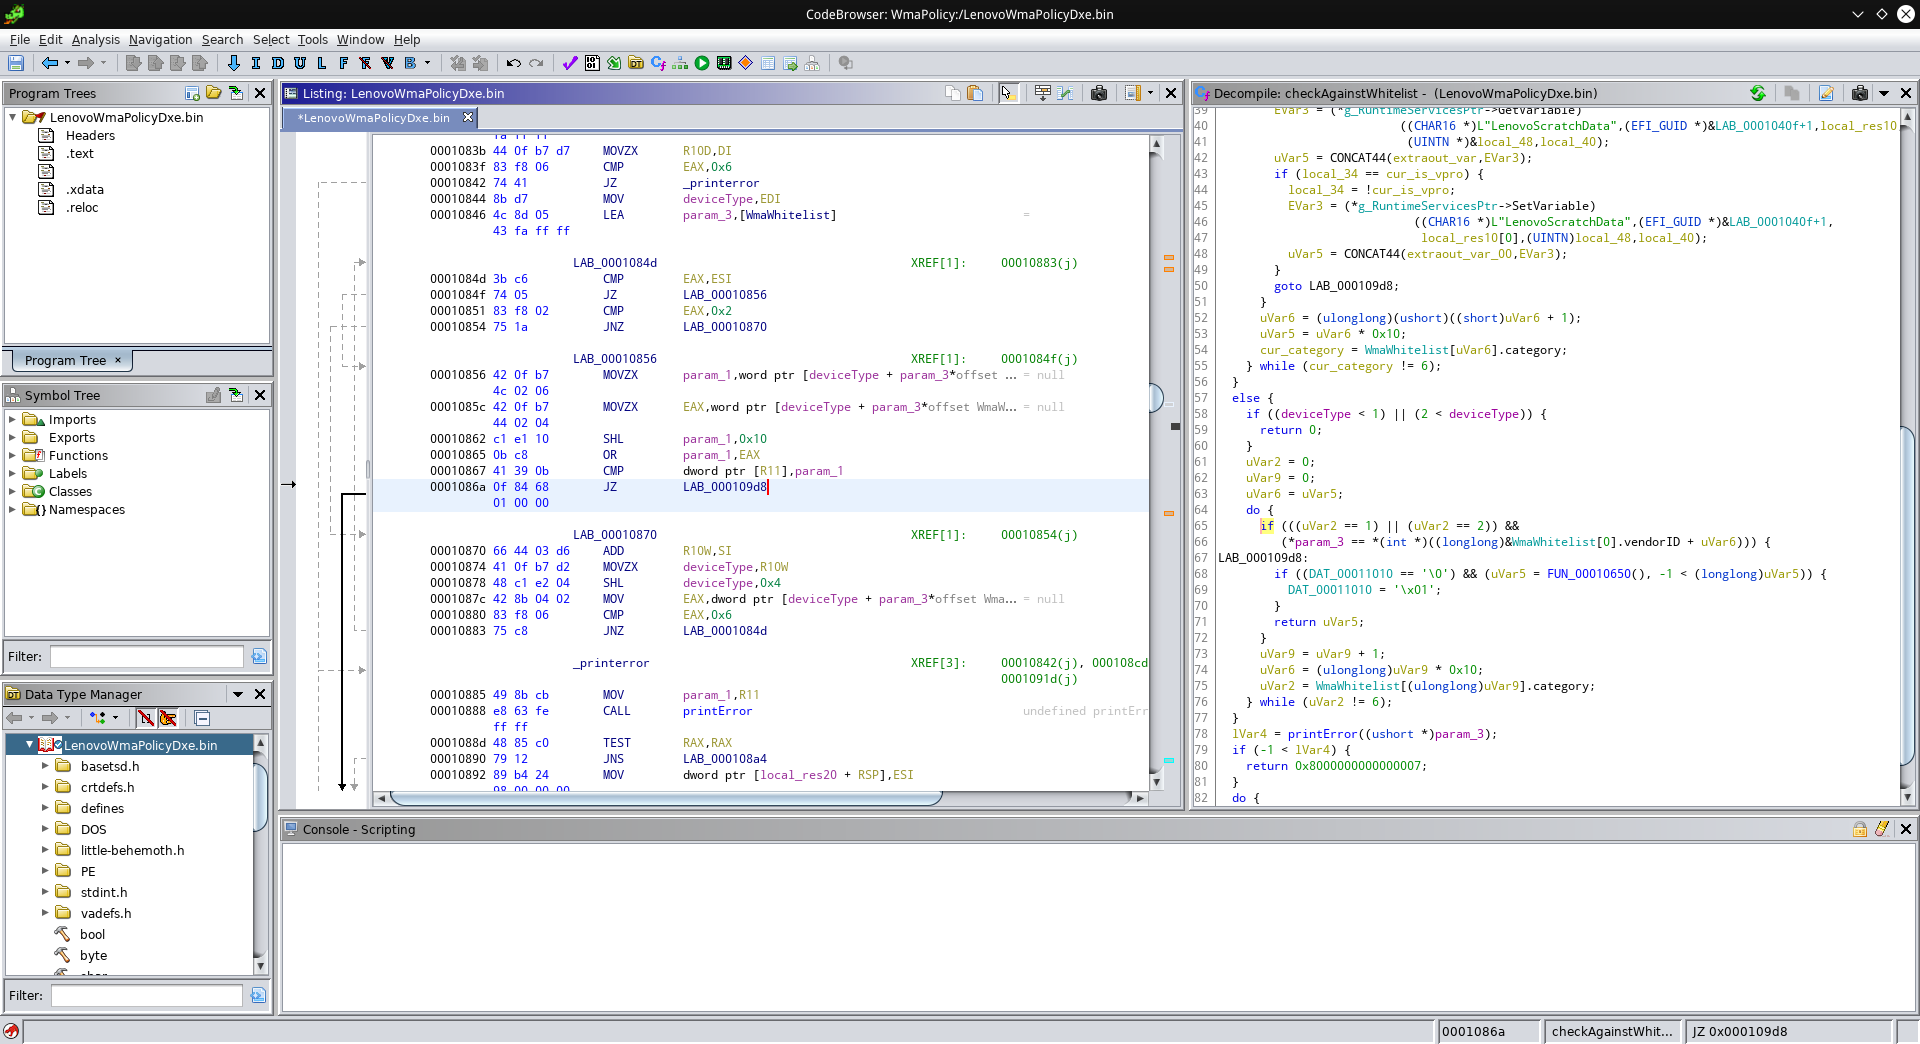
The next comparison to patch is this one:
This compares the subystem ID and the “unknown” field. If the comparison succeeds, the jump to 0x10925 gets executed. We can just replace the JZ (which executes the jump if the two values were equal) with a JMP (which always jumps):
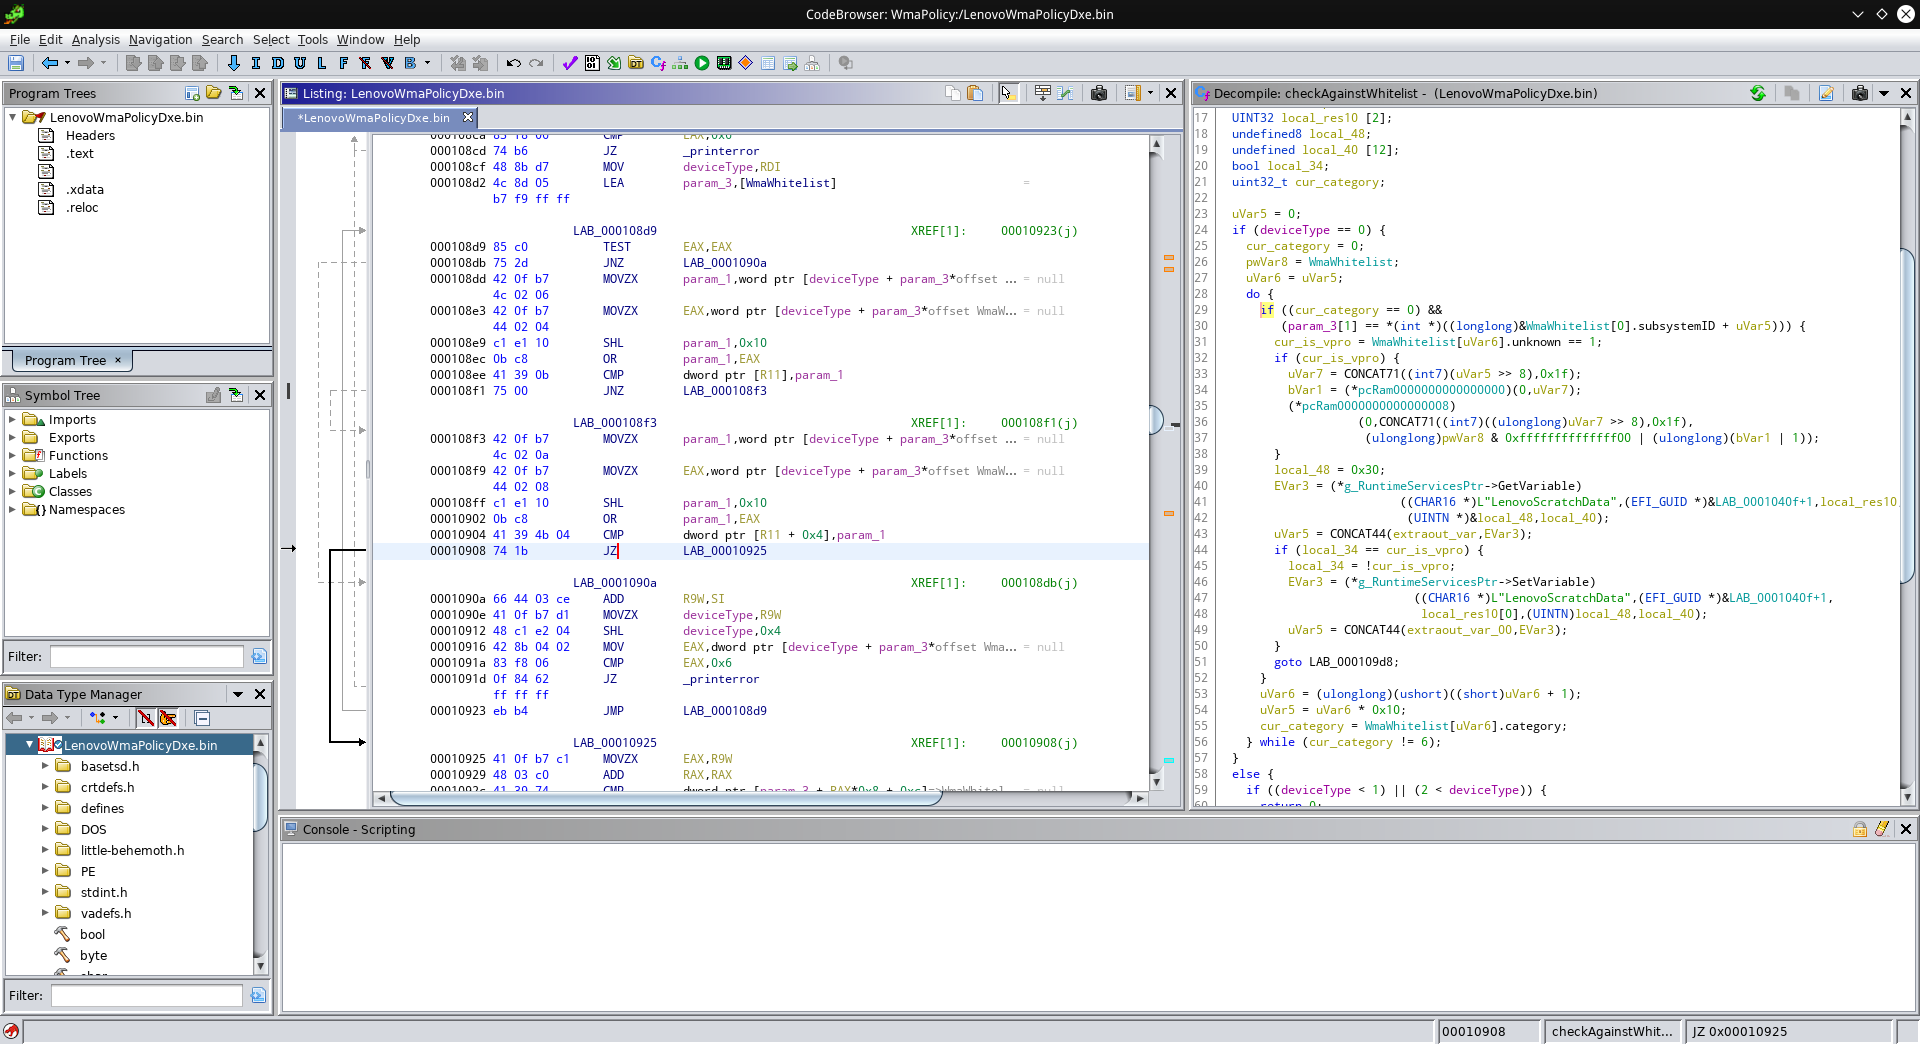
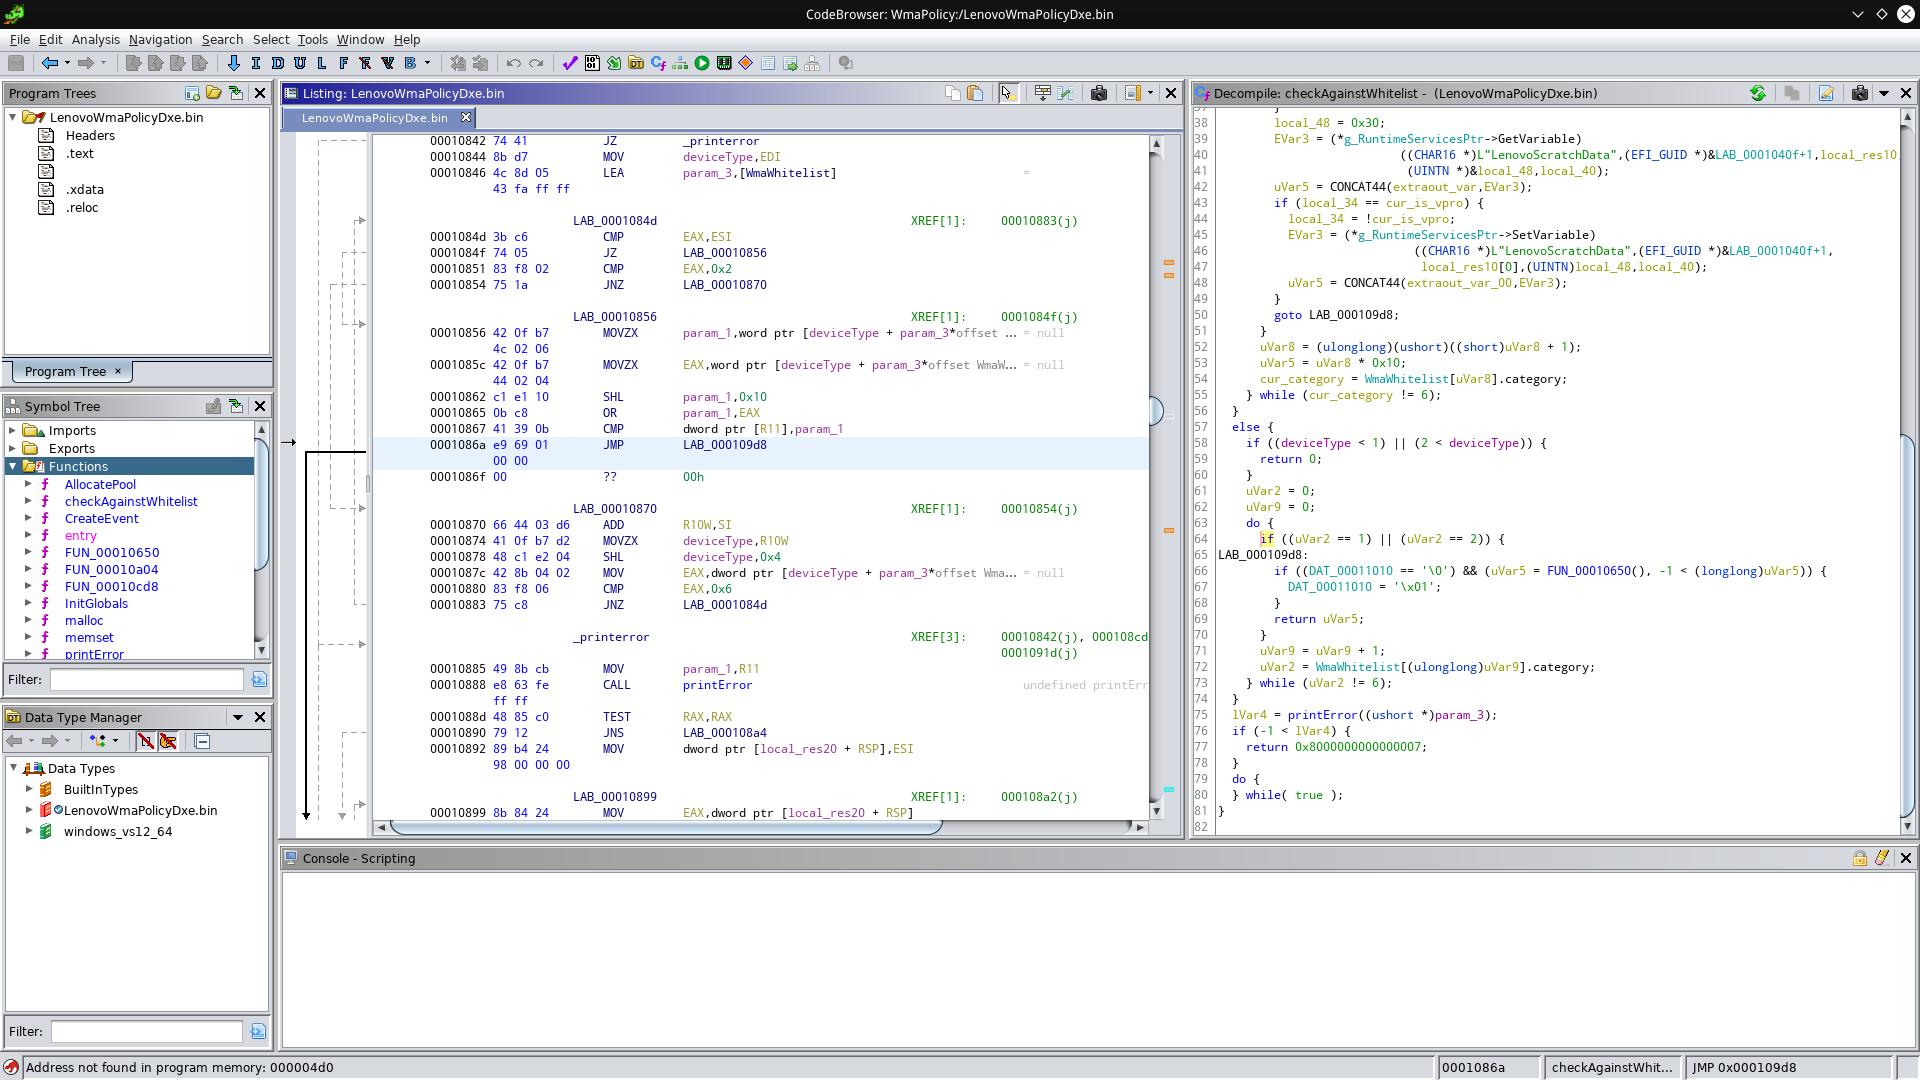
This takes care of the PCIe whitelist issue! Now we patch one more comparison to get rid of the USB whitelist as well:
Again, this jump only gets executed if the comparison succeeds. We replace it with an unconditional jump:
Now we’re essentially done, but unfortunately Ghidra does additional modifications to the binary if we try to export it again. So instead, we’ll use UEFIPatch. For this, we’ll need to keep track of which bytes we changed and how - you can do this by undoing and redoing the changes in Ghidra and write down the bytes, or export the binary and use a tool like vbindiff. If you do either of this, you should end up with a patchstrings like these:
79E0EDD7-9D1D-4F41-AE1A-F896169E5216 10 P:0bc841390b0f8468010000:0bc841390be96901000000
79E0EDD7-9D1D-4F41-AE1A-F896169E5216 10 P:41390b7517:41390b7500
79E0EDD7-9D1D-4F41-AE1A-F896169E5216 10 P:41394b04741b:41394b04eb1b
These patchstrings include the GUID of the “LenovoWmaPolicyDxe” module, the module type (10=PE), the patching method (P means that we specify how the bytes looked before and after) and finally the before and after blocks. This means that, for example, the second string searches the module for the byte sequence 41390b7517 and replaces it with 41390b7500.
To see what we can now do with these patchstrings, see the next section.
TL;DR:
- Make sure you’re on firmware 2.53 (I recommend to disable the TPM as a precaution)
- Create an image of your firmware (make sure it’s valid!)
- Grab the “whitelist-removal.txt” patch file from https://github.com/thrimbor/thinkpad-uefi-patches/tree/master/T440p/2.53
- Run UEFIPatch:
uefipatch original_firmware.bin whitelist-removal.txt -o modified_firmware.bin - Flash your T440p with the modified firmware
On the first boot, your ThinkPad may let out five beeps twice, but then should continue to boot, and have no whitelist.